Thursday, 29 October 2015

Garlic Mayonnaise

Making mayonnaise is something I've always wanted to try but I've always been a little scared of it... I'm sure you've seen on TV that chefs all talk of the horrors of split mayonnaise and there are so many tips on how to 'rescue' it that I was just convinced that it would be a disaster. Still, I plucked up the courage this week to try it anyway and guess what? It worked!


The problem with mayonnaise is that by its very definition it mixes two substances (water and oil) that would usually repel each other and emulsifies them so they don't try to separate. If you don't get that emulsion quite right, you end up with a horrible split mess. Not good.

I really love the way that all the ingredients in a basic mayo have a purpose; the egg and oil are the main parts, then mustard is added as it contains substances that aid the emulsification and an acid helps to inhibit the growth of nasties.

I've used dijon mustard and lemon juice as my mustard and acid elements but feel free to experiment with others; if using a dried mustard powder, just use 1tsp though or it may well blow your head off!

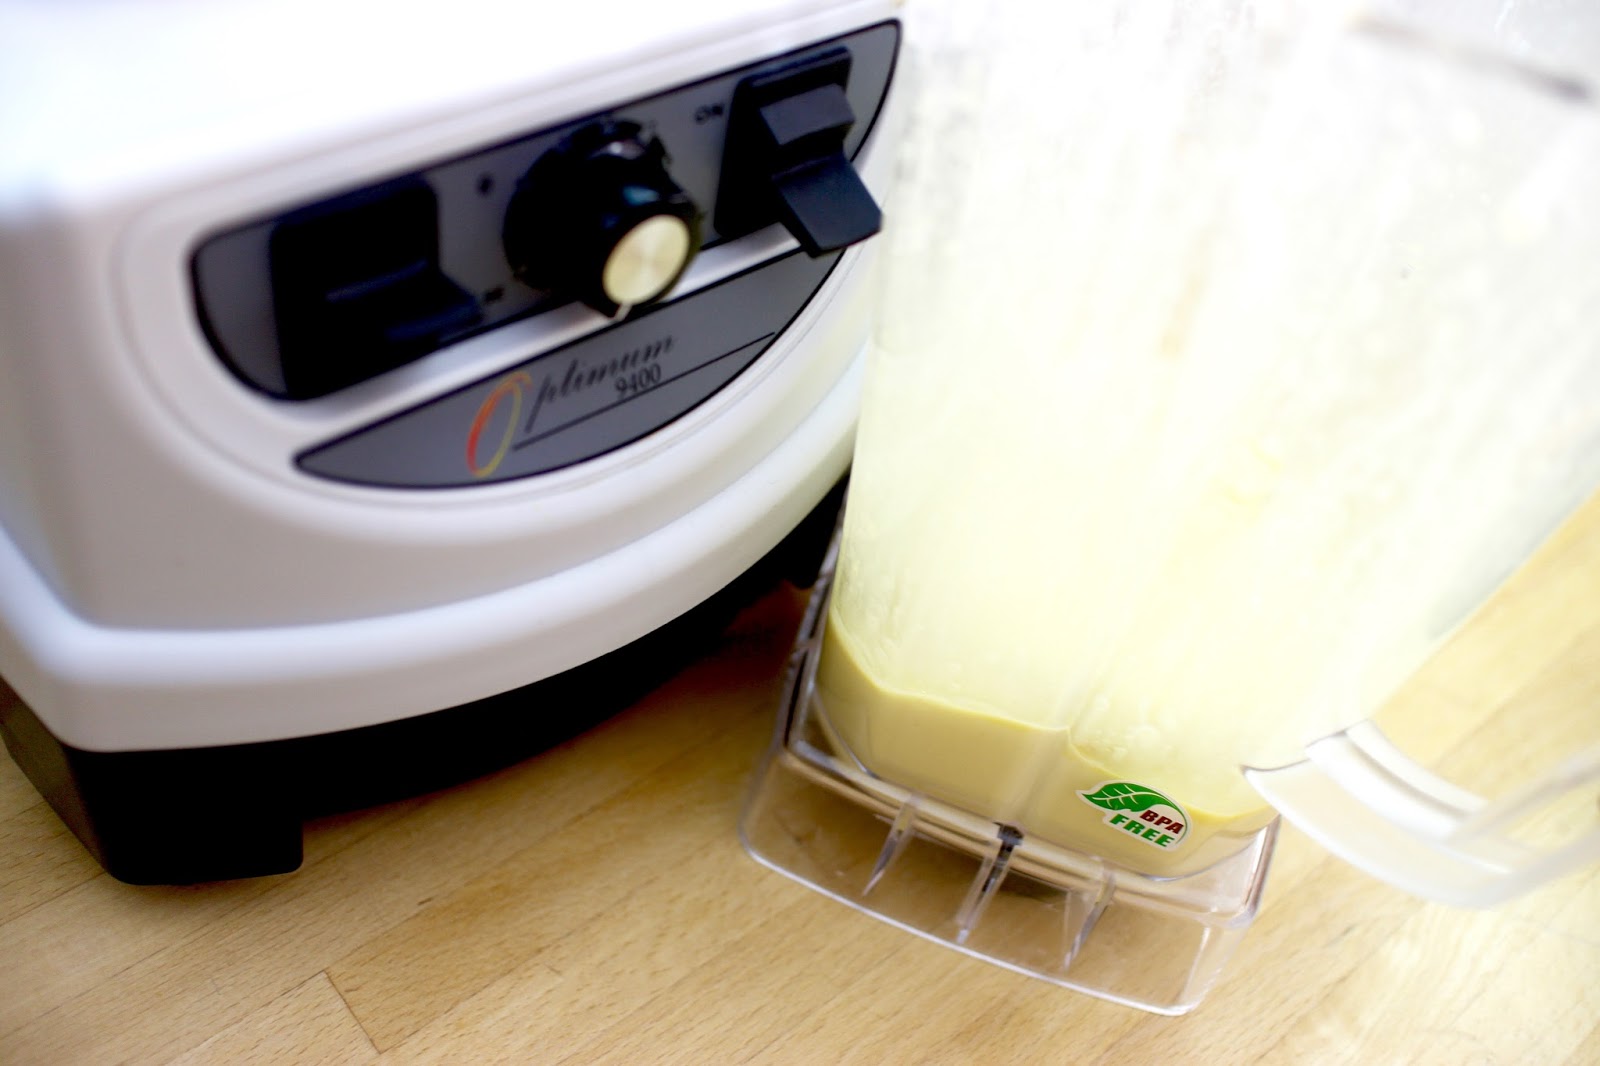
To make this completely fool-proof I've used my Froothie Optimum 9400 power blender. This blender operates at such high speeds that it's hard to get the mayonnaise wrong unless you add the oil far too quickly. It is much less prone to error than whisking by hand and even a standard food processor, but these two methods will also work if you add the oil slowly enough.

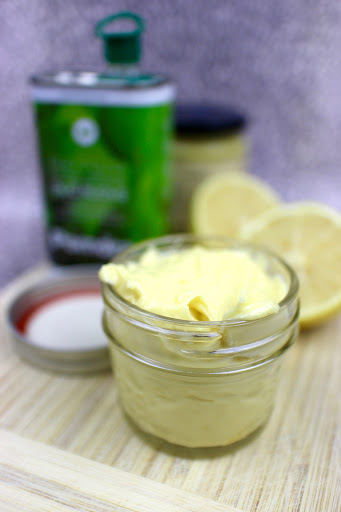
I'm a firm believer in using good quality olive oil in my mayo too, but I like to blend it with a lighter oil so the flavour is not overpowering. For this recipe I used fantastic quality Pomora olive oil blended with a local rapeseed oil.

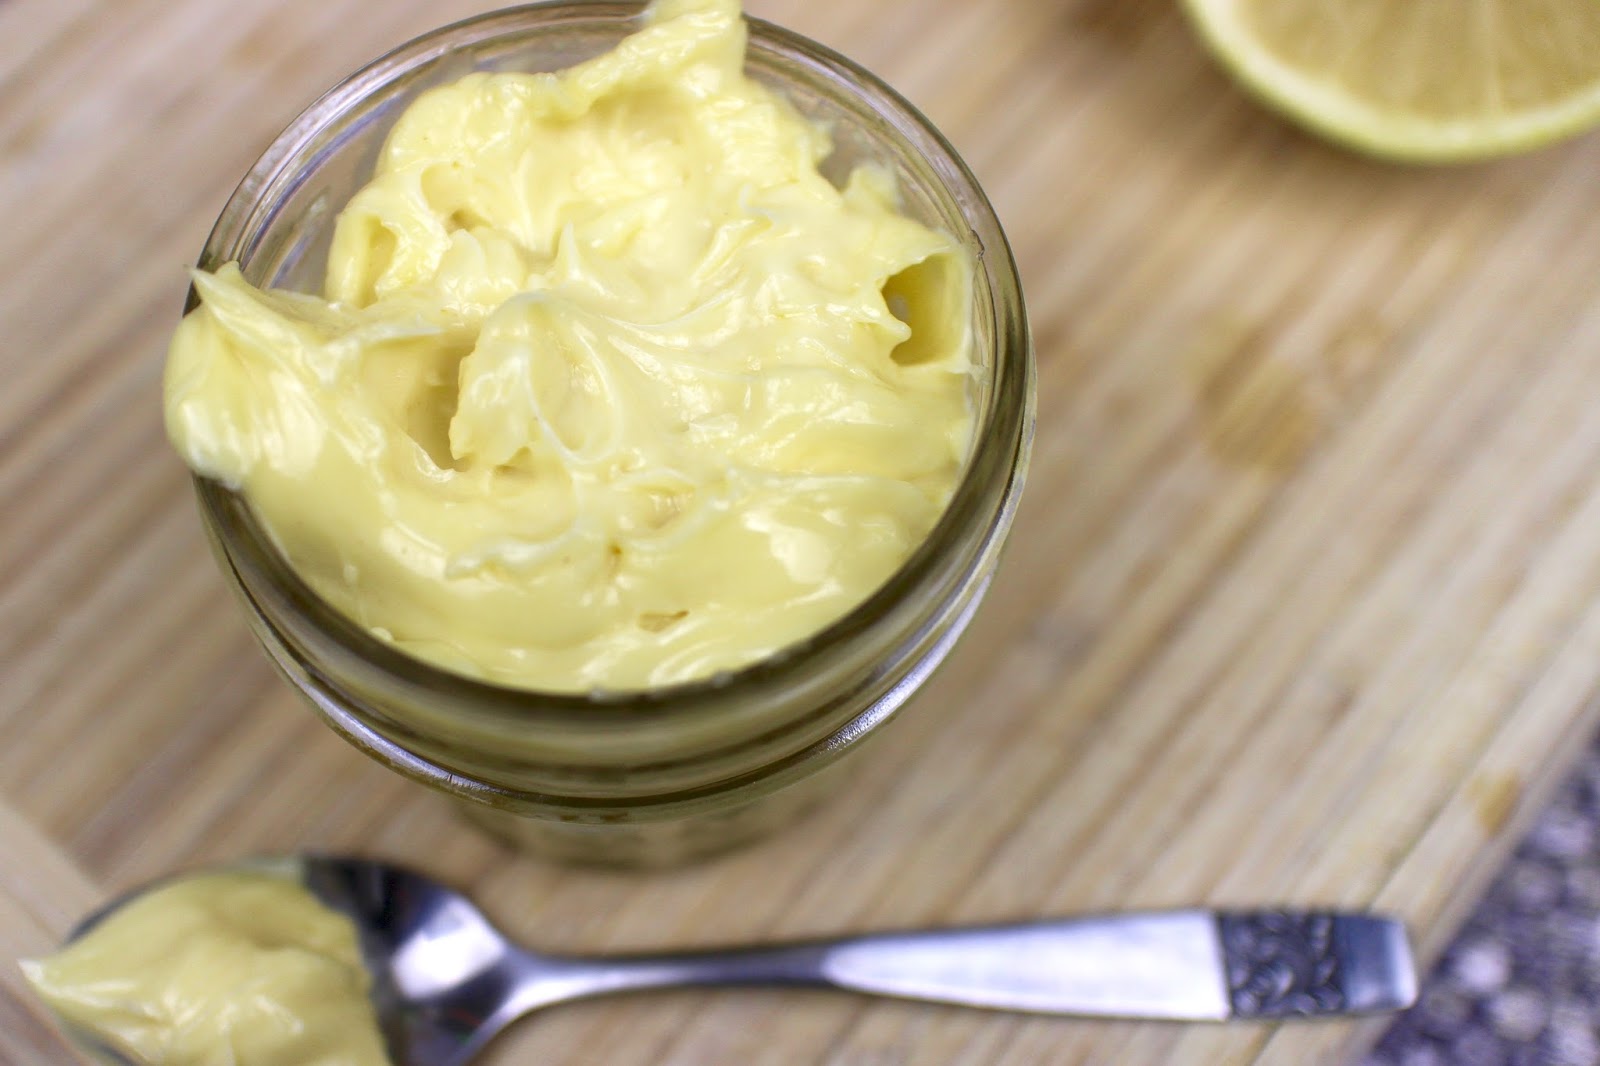
Every mayonnaise needs a pretty little jar and my version is no exception! I used the cute little 135ml Quilted Crystal Jars from Ball Preserving. Pretty!


I've flavoured this mayo with garlic but you could use anything that takes your fancy... Or just leave it plain! The choice is yours.

print recipe

Garlic Mayonnaise
A good basic mayonnaise, a fool proof method and a nice hit of garlic!
Ingredients
  • 2 medium egg yolks
  • A good pinch of salt
  • 1tbsp lemon juice
  • 1tbsp dijon mustard
  • 1 clove garlic, crushed
  • 150ml olive oil
  • 150ml rapeseed oil
Instructions
1. Place the egg yolks, salt, lemon, mustard and garlic into the blender and blend for around 10 seconds until pale and fluffy. 2. Pour the oils into a jug, then set the blender to speed 2 and remove the stopper from the inside of the lid. This speed should be fast enough to emulsify the mayo but not so quick it splatters all over the cupboards. (Don't ask how I know this…) 3. Pour the oil into the blender in a slow, continuous stream. It should take around 60 seconds to pour all of the oil into the blender. Feel free to stop pouring a few times and peer into the blender to make sure everything is coming together well. 
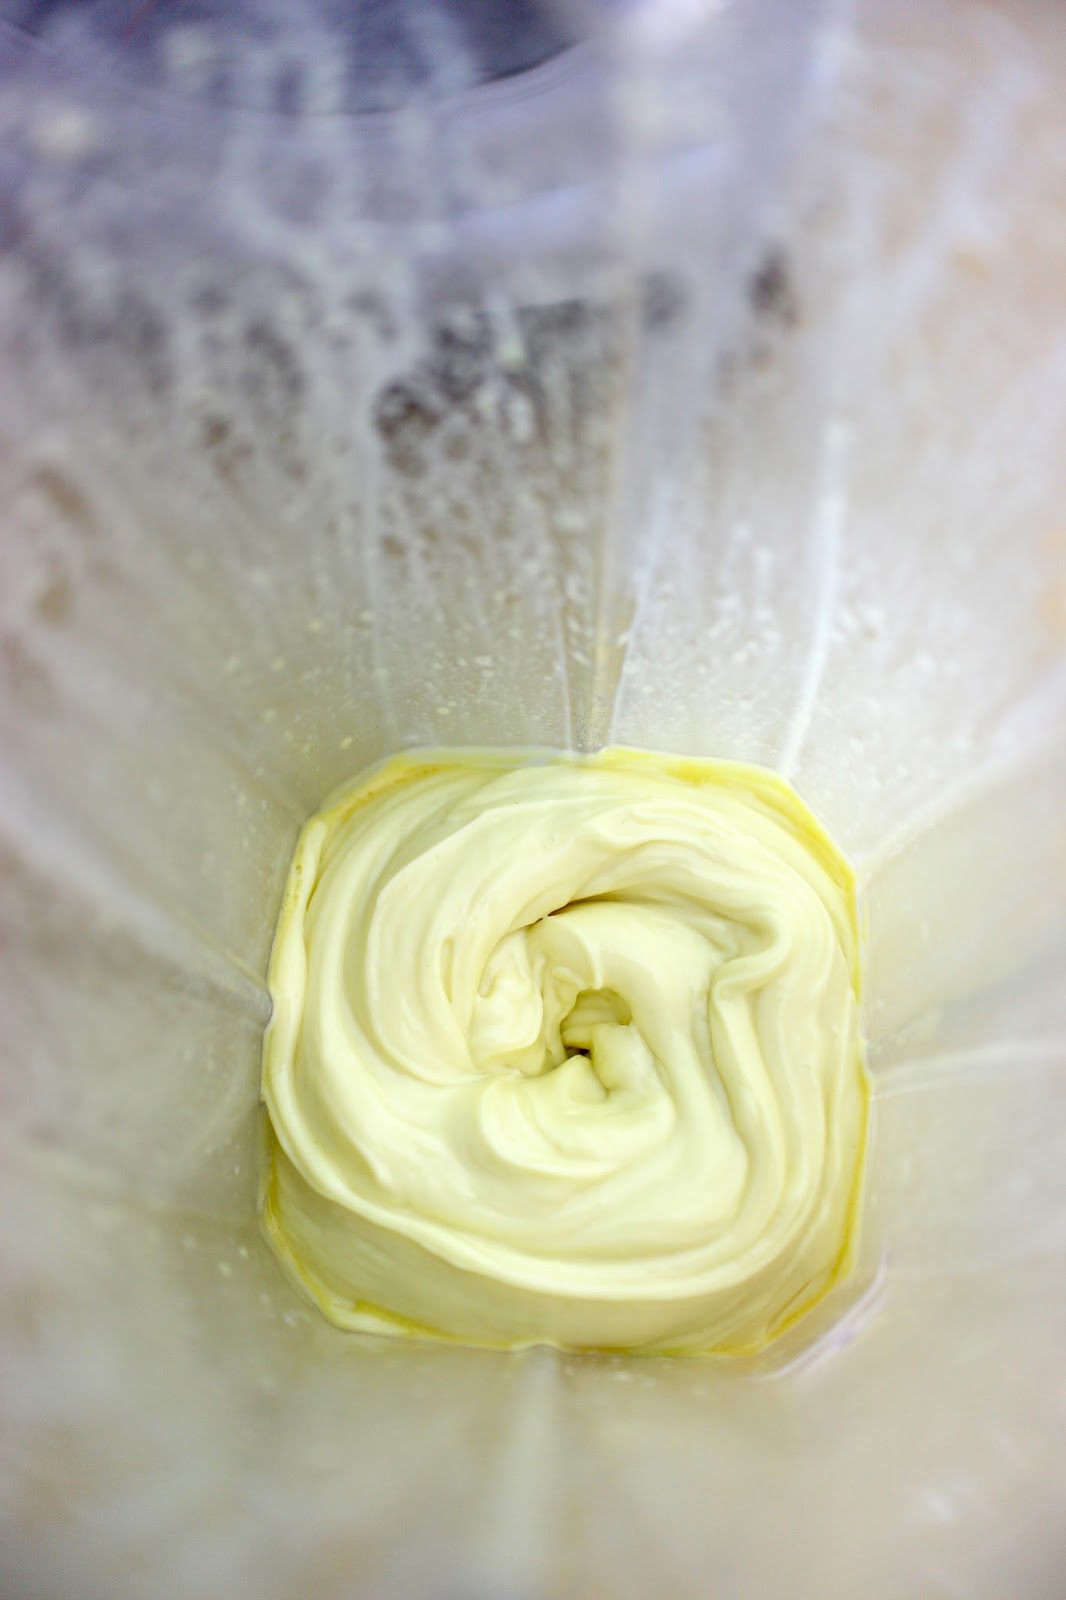
4. You should now have a thick and glossy mayonnaise! Serve immediately or place in a clean jar and store in the fridge for 3-4 days.
Details
Prep time: Cook time: Total time: Yield: 300-400g mayonnaise


So now you've made mayonnaise, how will you use it? Here are a few ideas...


Disclaimer:
 I am a Froothie ambassador because I think their products are awesome! This post contains affiliate links and a commission is earned if you buy using those links.
 I was also sent some Pomora Olive Oil to try. As always, I wasn't expected to write a positive review and all opinions are my own. The Ball preserving jars were purchased by myself; I just mentioned the brand because they are so pretty!

Sunday, 25 October 2015

Mum's Norfolk Pasties

Last Sunday I posted some pictures of my Mum's pasties she'd sent me home with earlier that day. Rather than just snapping a quick picture with my phone, I decided to take a bit more time with my camera; more due to me wanting to practice my photography techniques than anything else. I posted them on Twitter, Instagram and Facebook and it soon became very apparent that it was a good job I took good photographs of them; I was going to have to blog the recipe because you loved them!


When I first asked Mum to give me the recipe she told me that it was really simple. "Just a bit of this and a bit of that" she said. Thanks mum, but I don't really think my readers would appreciate that as a recipe! After a bit of light harassment, she wrote down the recipe for me. As she handed it over, she said "I can't believe anyone wants my recipe for these. They are so simple!" So if you do appreciate the recipe for this, give my mum a little comment at the bottom of this page. I bet she'll be delighted.

In my family, these have always been called "Cornish Pasties" but of course these have a Protected Geographical Indication (PGI) meaning they must be made in Cornwall. So, to stop the cornish heavies from coming to get me I've called these Norfolk Pasties because, well, why not?

This recipe is a bit old fashioned. For the pastry, the only fat used is lard. I know lard gets a bad reception these days so you can totally substitute all or part of it for butter. I wouldn't though, until you've tried it at least once. This pastry is the crumbliest, most tasty pastry I've ever tasted and I can only put that down to the lard.


Of course, you could play around with the filling all you like too. Feel free to add in some mature cheddar or stilton cheese, or swap out the meat for more vegetables. Let your imagination run wild!

Rather like a mean Mary Berry setting a technical challenge in the bake off, Mum didn't give me the method other than to say "you should know how to make these, you've watched me enough!" so the method is mine. I'm sorry Mum if I do anything in a slightly different way! I bet they'll still be delicious.

print recipe

Mum's Norfolk Pasties
A delicious family recipe for "not quite Cornish" pasties. Make in big batches, because everyone you know will want one (or three!).
Ingredients
  • 450g lean stewing steak
  • 1 onion
  • 1 carrot
  • 1 large potato
  • 200g tin of baked beans
  • 1 beef stock cube (Mum says Oxo are best)
  • 1tbsp cornflour
  • 900g self-raising flour
  • 450g lard
  • 1 beaten egg (to glaze)
Instructions
1. Peel the carrot, potato and onion and chop along with the meat into small evenly-sized pieces. 2. Lightly brown the meat and onion in a little oil, then add the vegetables and cook for another minute or two. Add the tin of baked beans, stock cube and a mug of boiling water then bring to the boil and simmer for 2 hours, stirring every now and then. 3. After the long, slow cooking the meat and vegetables should be very tender and the gravy should be thick and just coating the rest of the ingredients. If the gravy is a little thin, mix 1tbsp cornflour with a little cold water then add a little at a time until the gravy is nice and thick. 4. Put the filling to one side whilst you make the pastry. Rub the lard into the flour until the mixture resembles breadcrumbs then add cold water 1tbsp at a time until the dough just comes together into a ball. Do not over-mix or the pastry will be tough. Place in the fridge for 30mins to rest. 5. Once the pastry has rested, the filling should be cold. Pre-heat the oven to 180ºC, then divide the pastry into 6 pieces. Taking one piece at a time, roll the pastry into a flat round about the thickness of a £1 coin. Place filling into one side, then fold over and crimp the edges with a fork. 6. Brush the tops of the pasties with beaten egg and poke a hole in the top to let out any steam. Bake in the oven for 25-30 minutes until golden brown and cooked through. Serve warm from the oven, or leave to cool completely and serve cold. These reheat beautifully in the oven too!
Details
Prep time: Cook time: Total time: Yield: 6 pasties


For more great pasties, check out these delicious recipes:

  • Spinach Pastries from Little Sunny Kitchen
  • Mini Cheese & Onion Pasties from The Veg Space
  • Squash, Chilli, Chard and Feta Pasties from Tin and Thyme

Tuesday, 20 October 2015

GIVEAWAY: TioTina Oven Gauntlets

Let's be honest... How many of you have burned yourselves when pulling something hot from the oven because you've used a tea towel that's too thin or slightly damp? Now, be even more honest and tell me how many of you did this when you had a protective oven glove just sitting on the side or in a drawer?!

The truth is, I bet around 80% of people would answer 'yes' to both of these questions... I know I would! The problem of how to remove a hot dish from an oven is quite real and until now there hasn't been a solution that works particularly well. If you use a tea towel, there's only limited protection as it doesn't cover the whole hand and heat travels really fast through the thin cotton. On the other hand (if you'll excuse the pun!), thick oven gloves offer a lot of protection but they tend to be really restrictive in terms of movement and don't provide much in the way of grip. I've dropped more than one oven dish whilst getting it out of the oven wearing oven gloves.

So, do I need to just accept that from time to time I'll burn myself on that heavy roast chicken tray or drop the perfectly baked macaroni cheese on the floor? Not any more; TioTina Oven Gauntlets are my saviour!

These wonderful oven gauntlets are worn just like a pair of winter wooly gloves. They have fingers to give you all the flexibility you want whilst still having the superior protection from heat. They even have little silicone patches to help with grip.

I don't use anything else when removing things from the oven now. My hands and my food are too precious to risk damage to them using a tea towel or oven gloves!

Now I've told you all about them, I bet you want to know where you can buy some of these wonder-gauntlets? Well, they are available over on Amazon but I also have a pair to GIVEAWAY! That's right, one lucky reader will receive a pair for FREE. To enter, just follow the instructions on the widget below. Please note: Entry is open to UK Residents ONLY and commenting on this blog post is mandatory.

Disclaimer: I received a pair of TioTina Oven Gauntlets to review and another pair to giveaway. As always, I was not expected to write a positive review and all opinions are my own.

Good luck!

Saturday, 17 October 2015

Spicy Cheese and Chorizo Bagelini

Yes, that's right, I did say BAGELINI! What's one of those, you ask? Well, I made it up! A bagelini is the lovechild of a bagel and a panini. Some might call them a toasted bagel but I like to be much more dramatic than that...

This is such a simple recipe that it almost doesn't warrant being on the blog, but I do like to pride myself on posting about things that appeal to a range of ability levels and I think making a good toasted sandwich is a really valuable life skill!

I really love bagels, but they're not often sold as toasties which I think is a real big shame. I love the crisp exterior and slightly chewy inside a bagel gives to this snack. The type of bagel is also really important; a sesame seed version gives a great flavour and texture once the seeds are toasted in the press.

You can use your favourite hot sauce in this recipe, but I was recently sent some Peruvian Amarillo Chilli Sauce by Encona and it was perfect in this Bagelini. It added a lovely spicy note, with a slight tang of garlic and herbs too. Delicious!

I used my Tefal Optigrill to toast my Bagelini and it does a great job as it has a floating hinge which allows downwards pressure without pushing the bagel sideways like some presses can with a traditional hinge. However, if you don't have a panini press or grill, you can still make your own Bagelini with two frying pans. Just heat one pan over a hot heat, then place the bagel into another pan over a medium heat whilst squashing it down with the hot side of the first pan. If you get this right, you will end up with a Bagelini that is perfectly cooked and brown on both sides but, if the top pan cools too quickly, just flip over the bagel and continue to heat.


So, now that you know how to toast the bagel, here's the full recipe...

print recipe

Spicy Cheese and Chorizo Bagelini
A spicy toasted bagel made with cheese and chorizo is made extra tasty by a splash of hot sauce.
Ingredients
  • 2 sesame seed bagels
  • A splash of hot sauce
  • 50g mature cheddar cheese
  • 6 slices cured chorizo
Instructions
1. slice the bagels in half then spread with with hot sauce and top the bottom half with the cheese and chorizo before replacing the lid. 2. Cook using your preferred method until golden brown and crispy on the outside. 3. Enjoy served with a side salad or good quality hand-cooked crisps.
Details
Prep time: Cook time: Total time: Yield: 2 bagelinis


For other ways to use hot sauce, check out these top blogs:

  • Chicken Kebab with Chilli Sauce from How to Cook Good Food
  • Chocolate Bean Burgers from Tin and Thyme
  • Sausage Gnocchi Bake from Fab Food 4 All

I'm entering this recipe into the 'Club Sandwich' challenge I'll be hosting with the lovely Stuart from Cakeyboi. See his blog post for full details!


Wednesday, 14 October 2015

Negroni & Other Halloween Cocktails

So, it's now October which means I can talk about what is probably my FAVOURITE of all the holidays... Halloween!

I really love a Halloween party so around this time of year I start to scope out ideas for new drinks and nibbles to wow others at the parties. Thankfully, I don't need to look any further for drinks as I was contacted recently by thebar.com who asked if I wanted to try one of their halloween cocktails. I'm all for test runs, so of course I said yes and my cocktail of choice was the Negroni!


Don't be fooled by the colour. I know it looks like cherryade, but beware because this cocktail packs a PUNCH!

I often think that as a nation we seem to have forgotten how lovely bitter flavours are, but this cocktail certainly hasn't forgotten and it really does carry a bitter edge. If I'm honest, I think it was a little too bitter for me and I added a little sugar syrup to round out the flavour but if you like bitter tastes I'm sure you will love this. The campari and vermouth also add wonderful orangey and herby flavours that make this taste like a very grown up drink indeed.


Picture the scene; a halloween party out on the terrace, canapés galore, me in a catsuit vampire outfit, drinking this delicious red drink. What could be more perfect for halloween?!

If you want even more fabulous inspiration for cocktails, be sure to check out The Bar's Halloween Cocktails section where you'll find excellent recipes for:

  • The Red Widow
  • A Bloody Easy Mary
  • Sangria
  • Zombie Pirate
  • ...and many, many more!

So now I've got you sold on the best drink for the end of this month, I'd better tell you how to make it...

print recipe

Negroni
With Mediterranean herbs, a hint of orange and gin botanicals, the Negroni recipe is full of flavour - and history. This classic Italian cocktail is loved by bartenders for its subtle bitterness and use of vermouth.
Ingredients
  • 25ml Gordon's® London Dry Gin
  • 25ml vermouth rosso
  • 25ml campari
  • 1 twist orange
Instructions
1. Fill a short glass with ice cubes. 2. Using a jigger, measure 25ml Gordon's London Dry Gin, 25ml vermouth Rosso and 25ml campari into the glass. 3. Stir with a bar spoon until the ingredients are well combined. 4. Using a cocktail strainer, strain the mixture into a short glass filled with ice cubes. 5. With a sharp knife and a chopping board, cut a piece of orange peel and twist over the rim of the glass to garnish.
Details
Prep time: Cook time: Total time: Yield: 1 cocktail


The Crafty Larder encourages you to drink mindfully. For advice on sensible enjoyment of alcohol please visit Drinkaware.

Disclaimer: This post was commissioned by The Bar. As always, all views expressed are my own personal opinions.

Sunday, 11 October 2015

Crocktober: Bakewell Macaroni Pudding

I was recently contacted by Crock-Pot as they wanted to tell me about something they are calling Crocktober. Rather than all of those October events that try to make you give up on things, Crocktober encourages you to break out the Crock-Pot and celebrate all those dishes that are cooked low and slow.

As part of Crocktober, I was asked to post about my favourite slow cooker recipe. This is an almost impossible thing for me; I love and cook so much in my slow cooker! However, when I sat down to think about it I knew that my favourite recipe would have to be an adaptation of one of my mum's recipes. Food is a big part of my childhood memories and whenever I eat something that reminds me of my childhood it makes me feel all warm and fuzzy inside. So, I decided to take my mum's sweet macaroni recipe and give it a punch of extra flavour.


Do not adjust your TV sets, you did hear me correctly! I said SWEET MACARONI. Crazy, huh?

I didn't think it was anything unusual until I started to talk to other foodies about it and they all thought I was completely crazy! It is really delicious though, so you should definitely try it.


I've given this an injection of flavour I don't think my Mum would really approve of, but then I'm a big boy now and I can do what I like with my recipes! (Only joking, I still do as I'm told!) I've added dried morello cherries, flaked almonds and almond extract for a delicious Bakewell-inspired version of this lovely dessert. Although the dried morello cherries can be reasonably expensive, PLEASE do not be tempted to use glacé cherries; they are not the same and have none of the sharp cherry flavour I want in this recipe. Sorry to be bossy, but it's for your own good...!

print recipe

Bakewell Macaroni Pudding
My mum's traditional sweet macaroni pudding, with the added flavour of cherry and almond.
Ingredients
  • 120g macaroni
  • 600ml whole milk
  • 60g sugar
  • 30g flaked almonds
  • 60g dried morello cherries
  • 1tsp almond extract
Instructions
1. Place all the ingredients into the pot of a slow cooker. You may need to warm the milk first as some slow cookers need to start with hot liquid; check the manual for yours if you're not sure. 2. Cook on low for around 3 hours, stirring every now and then to stop the pasta from sticking. 3. When cooked, enjoy sprinkled with some optional toasted almonds.
Details
Prep time: Cook time: Total time: Yield: 3-4 portions, depending on appetite


I thought the idea of sweet pasta dishes wasn't particularly popular, but I've managed to find these other fab blogs with similar recipes for you to enjoy:

Why not join in with Crocktober on Twitter? If you tweet, please use the hashtag #Crocktober.

Disclaimer: This recipe post was commissioned by Crock-Pot, who also sent me a slow cooker to use. As always, I wasn't expected to write a positive review and all views expressed are my own personal opinions.

Thursday, 8 October 2015

Peanut Butter Oreo Truffles

I have received product from Oreo for this post. It is an entry to the Foodies100 Wonderfilled recipe challenge sponsored by Oreo, which marks the launch of two exciting new flavours: Peanut Butter and Golden. The delicious new flavours are available in all major supermarkets at an RRP of £1.08. To find out more, visit www.facebook.com/oreo.

Anyone who knows me well will know I'm quite partial to an Oreo. I'll admit that in the past all I've done with them is dunk them in my coffee or a glass of ice cold milk. So, when Foodies100 asked me if I'd be interested in a challenge to create a recipe with Oreos I just couldn't resist.

A recipe created with regular Oreos would have been awesome enough but WAIT because this recipe challenge allowed me to play with two NEW flavours of Oreo; Golden and Peanut Butter. I'm a bit of a fan of peanut butter mixed with chocolate so I decided to use those to create my recipe.

I wanted to create something that would make an everyday item (essentially a biscuit) into something special. My mind was wandering all over the place, from ice cream to milkshakes and more, but then it hit me; Truffles!


I'd made truffles from biscuits before for my Scots' Caramel Wafer Truffles, but rather than using salted caramel to bind these together I used cream cheese! I wasn't sure how it would taste but it turns out it was a stroke of luck genius. The slight salty hit in the PB Oreos, the sweetness of the coating and the sharp edge of the cream cheese combine to create a flavour sensation. I made 11 truffles in total (about 20 mins ago) and now there are only 5 left. Oops!

To top my truffles I have used chopped nuts or my new favourite sweet-seasoning, Steenbergs Choco Sugar. You could use just about anything you like!

I did try the Golden Oreos too, for research purposes, and turns out they are delicious too! Perhaps I'll have a recipe featuring those coming soon.

So, how do you make your own little orange balls of joy? Read on, and I'll tell you...

print recipe

Peanut Butter Oreo Truffles
Use new Peanut Butter Oreos to make these delicious truffles. Perfect for an afternoon treat or for giving as a gift (if you don't eat them all first!)
Ingredients
  • 154g pack of Peanut Butter Oreo Cookies
  • 75g cream cheese
  • 100g orange candy melts or candy buttons
  • 30g white chocolate
  • Optional nuts or choco sugar for decorating
Instructions
1. Place the Oreo cookies into a food processor or blender and whizz into fine crumbs. Alternatively, you could put them into a bag and bash with something heavy! 2. Mix with the cream cheese to form a dough then take tablespoon-sized pieces and roll into balls with clean hands. Put in the fridge to chill. 3. Once the truffles have hardened, remove from the fridge. Melt the candy melts in the microwave then roll the truffles in the melts to coat. Set on a tray and put back into the fridge. 4. Once the candy melts have set, remove from the fridge. Melt the white chocolate and use to decorate the tops of the truffles. You could sprinkle nuts, choco sugar or sprinkles on top now to decorate. 5. Pop into the fridge for one last time. Once set again, they are ready to enjoy! Store in an airtight container in the fridge.
Details
Prep time: Cook time: Total time: Yield: 10-12 truffles


For more great Oreo recipes, have a look at these blogs:

As always, please do let me know in the comments box below if you love this recipe or if you have a favourite Oreo recipe of your own!
"; n.innerHTML = at; container.insertBefore(n , footer); } } return true; }; document.doAT('hentry');
Related Posts Plugin for WordPress, Blogger...

Other interesting websites