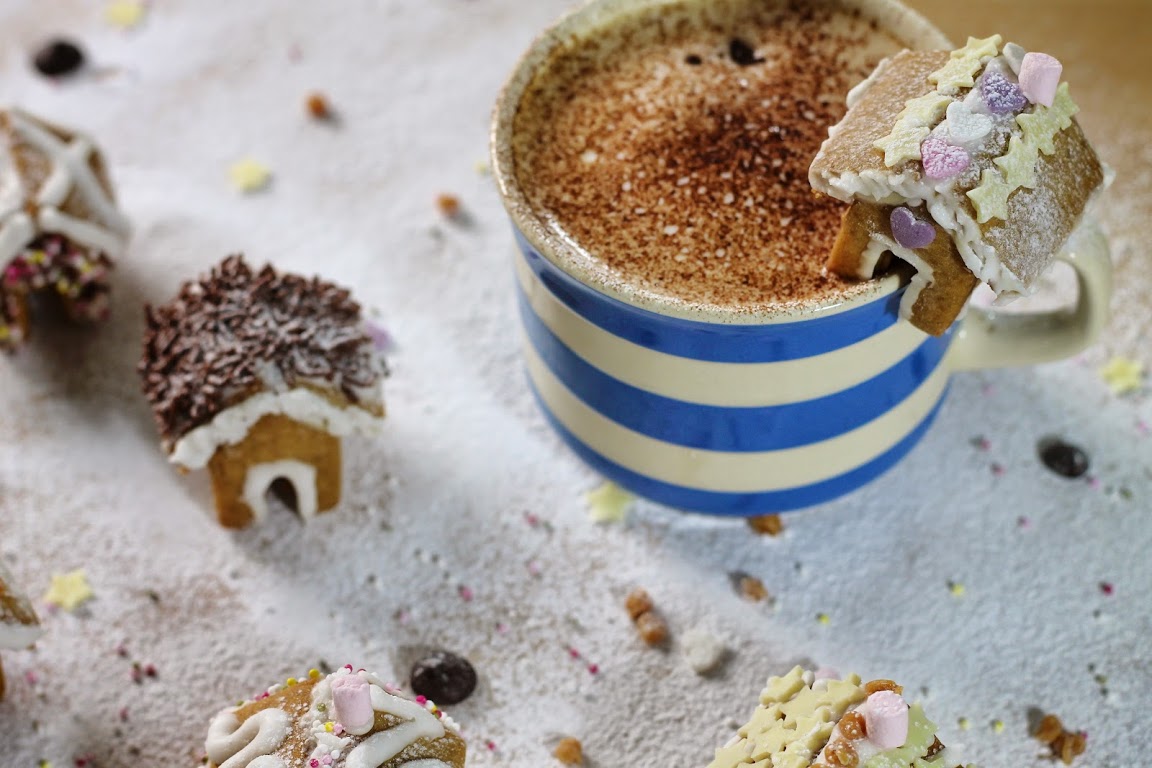
When I first saw these mini gingerbread houses over on the Custom Cutterz Facebook page, I knew I HAD to have some. In fact, I fell in love with them so much I ordered 2 sets of cutters!
They are so small, you can hook them over the edge of a cup. How cute would this be, to serve friends coffee over christmas with one of these perched on their cup?! They are delicious too, if you can bring yourself to eat them...
This was the first time I've ordered from Custom Cutterz but I will definitely be using them again. They provided an excellent service at a great price. I also asked them to create another custom cutter just for me and within a couple of hours it was done and on its way to me. Awesome! They use a 3D printer to create them so they can make a cutter in just about any shape. The idea of them being 3D printed appeals to my inner geek too.
They are a set of 3 cutters and they even come with a recipe to get you started right away. I used this recipe for my little houses but I cheated with the royal icing; rather than play around with egg whites etc. I just used a pack of royal icing sugar. A little splash of water and this icing sugar turns into perfect royal icing, just right for sticking the houses together and for decorating too.
To decorate, I used some of the multitude of baking 'sprinkles' that have been hiding in my kitchen cupboards and waiting patiently for an occasion such as this one.
I don't think I need to say any more about these adorable little houses. If you want to make them, head over to the Facebook page and get ordering the cutters!
For more great gingerbreaddyness, check out my board on Pinterest:
Disclosure: I paid full price for these cutters from Custom Cutterz. I was not asked to post about them on my blog, or to write a positive review; I've done it, because I think they are fab!
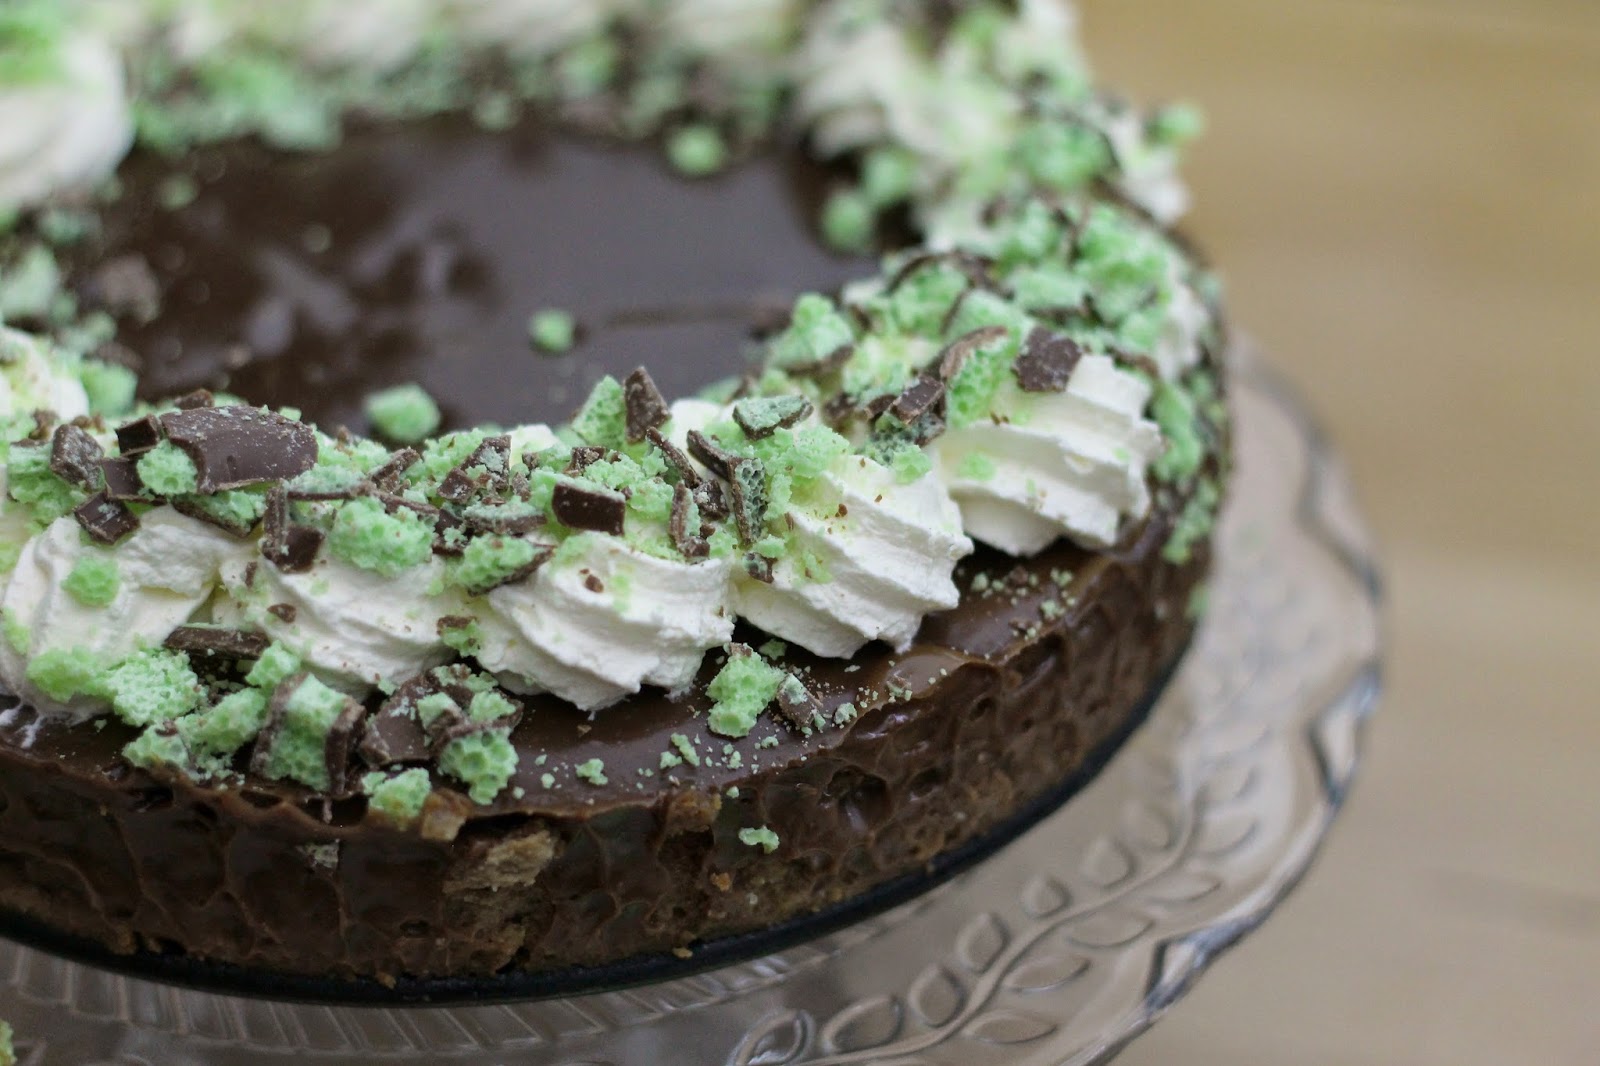
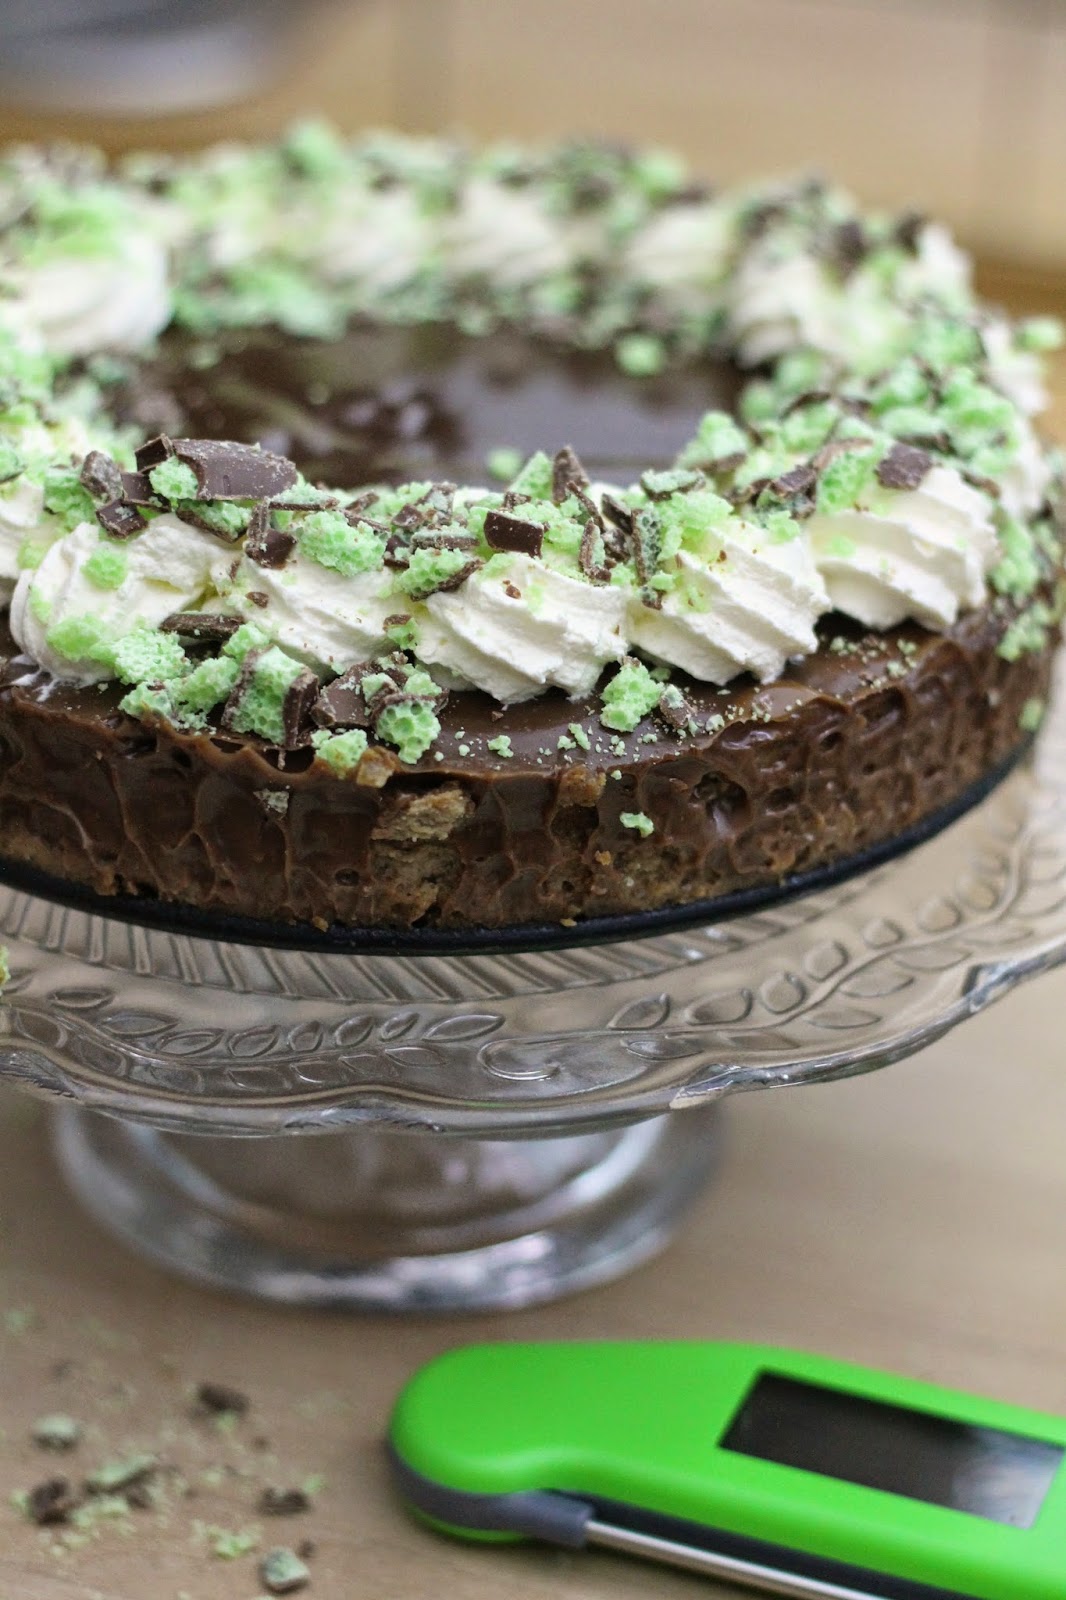
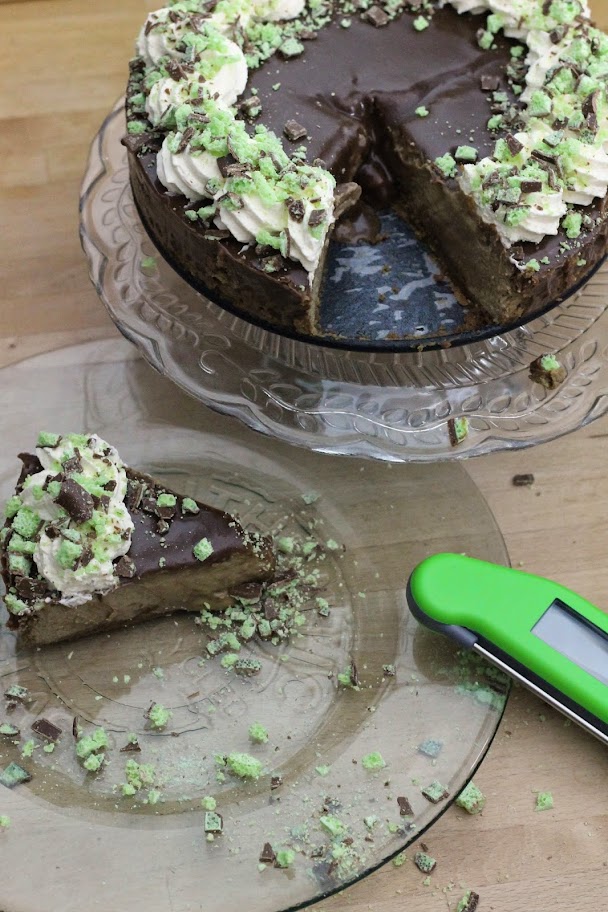
The first reaction of anyone who saw my cake last week seemed to be "Oooh, Mint Aero!" So, knowing how much people love this chocolate bar gave me the idea for this recipe... I just knew Mint Aero Cheesecake would be a WIN.
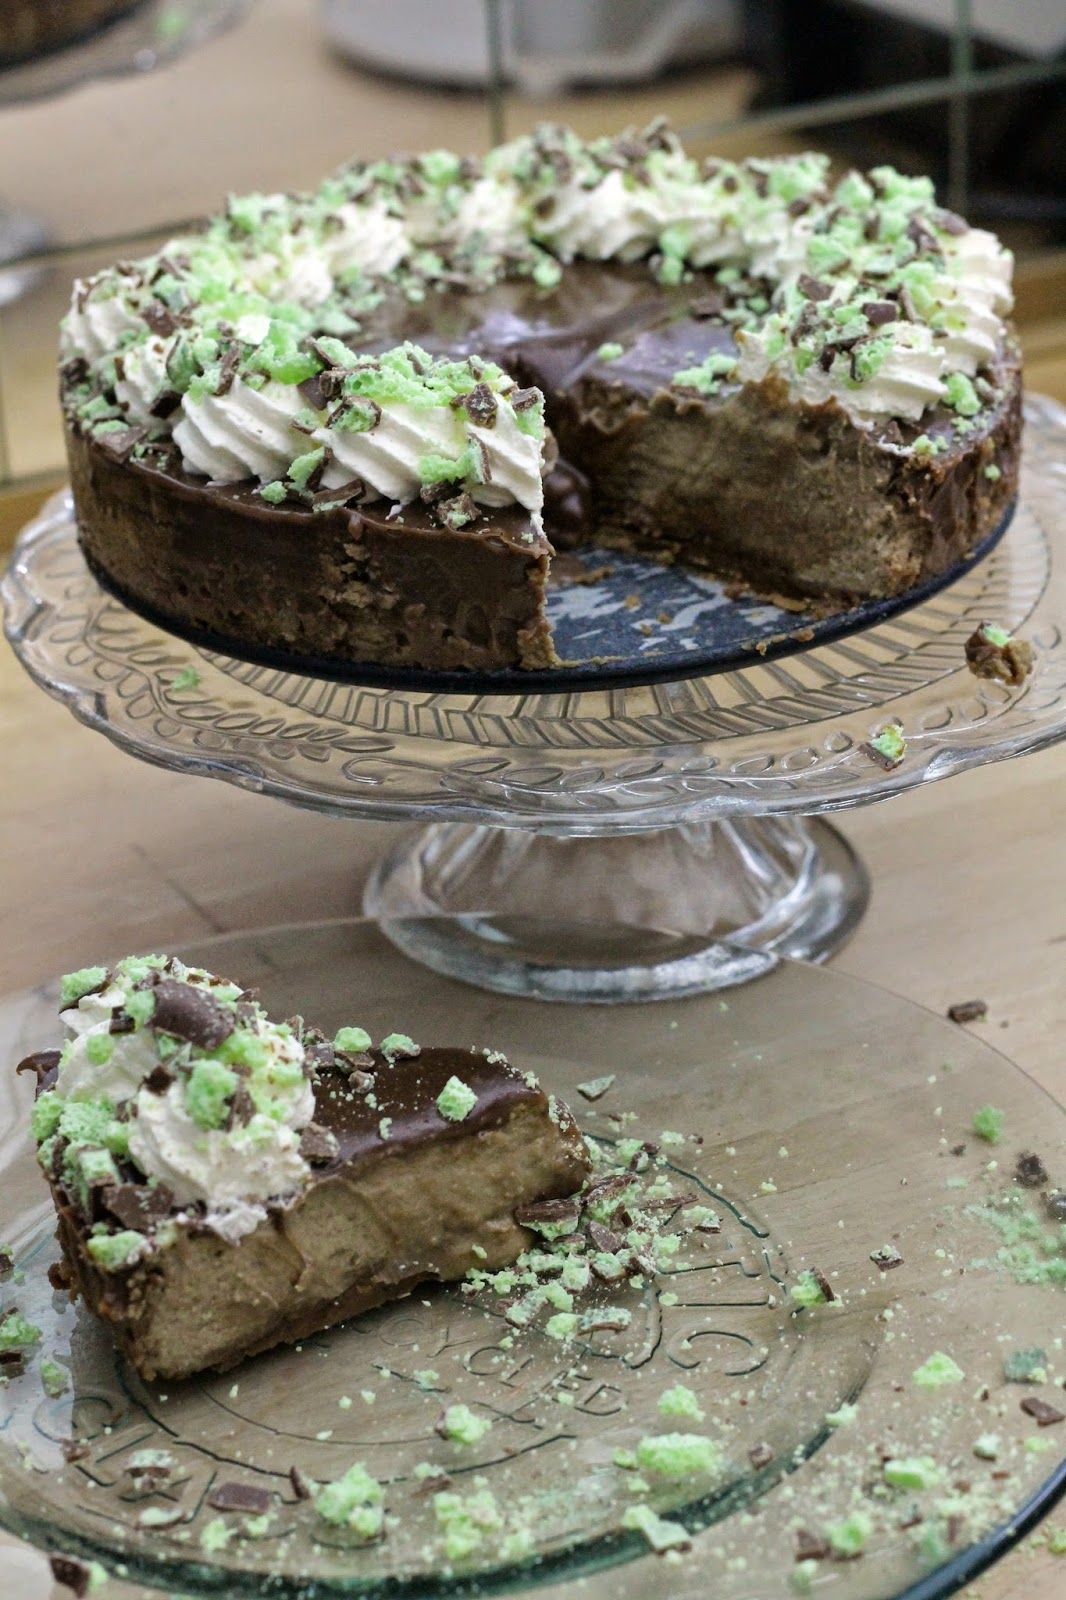
This is a baked cheesecake, in keeping with every other cheesecake I've ever made. I don't seem to have much success with things that require fridge time to 'set' such as an unbaked cheesecake. I think I'm just far too impatient to wait! At least with a baked cheesecake you can dive in once it's chilled.
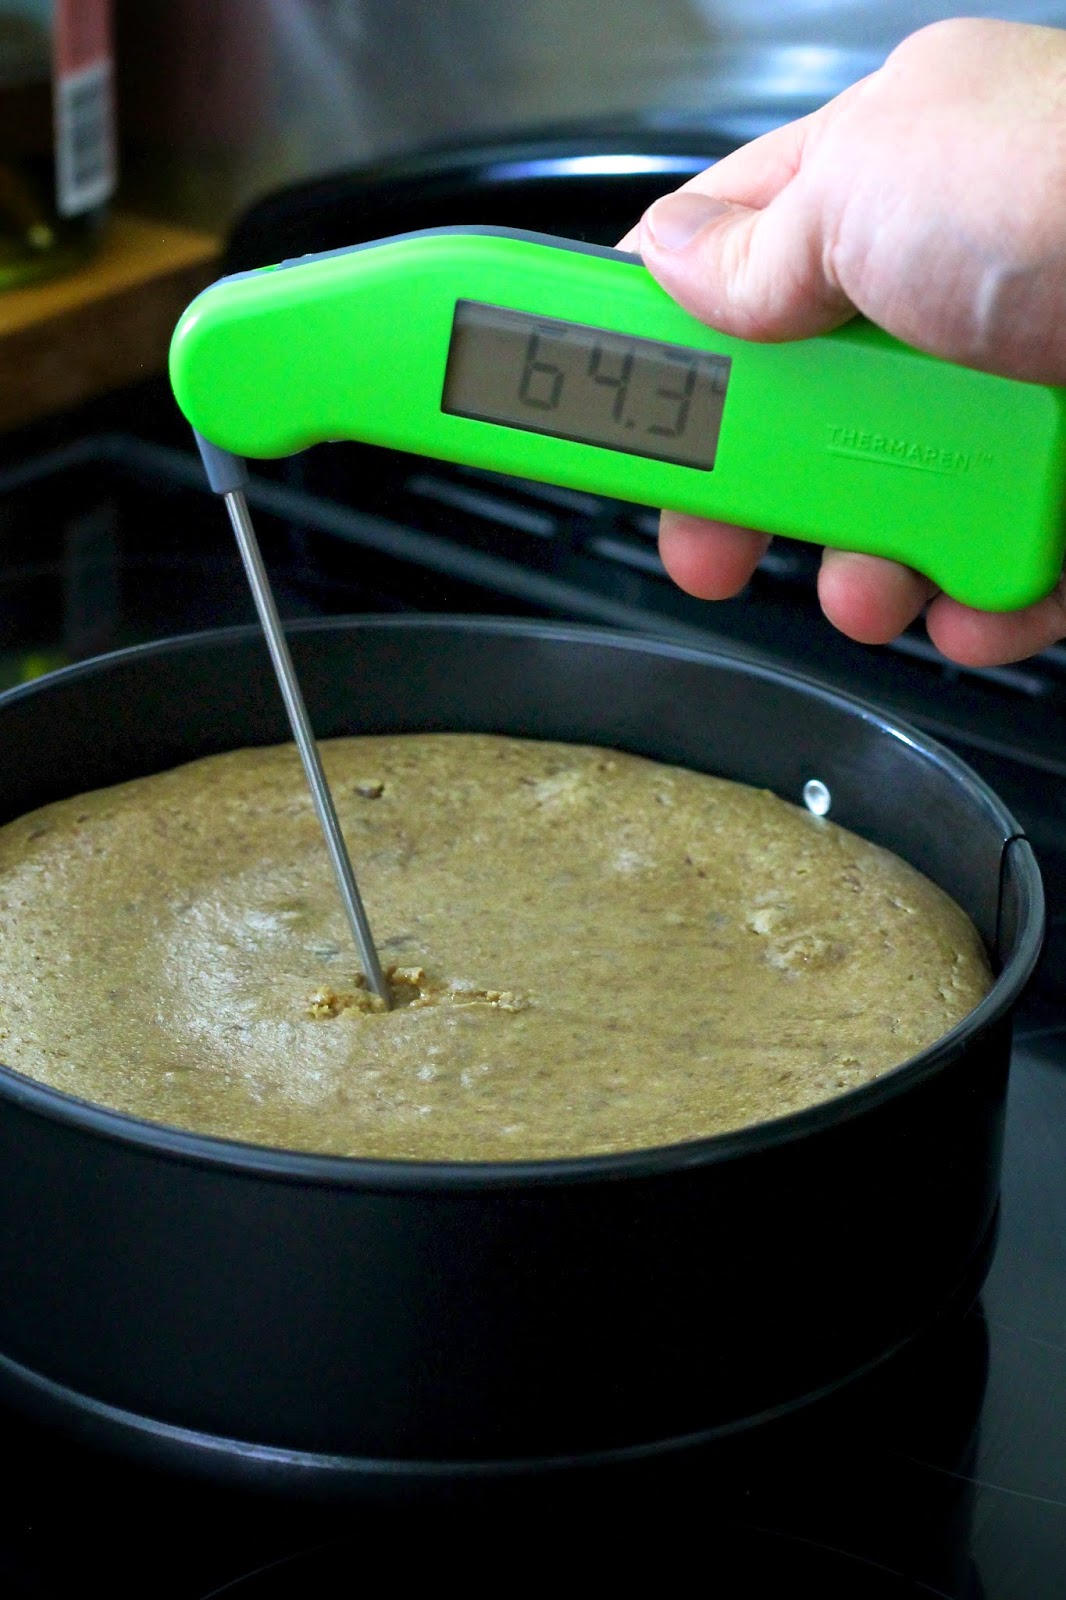
The slight complication (which anyone who has ever made a baked cheesecake will sympathise with) is how do you know when to take it out of the oven? Well, my 'knights in shining armour' from Buy Catering came to my rescue on this one as they sent me a wonderful Thermapen to review this week. Thermapens are widely regarded as the rolls-royces of food thermometers as they are super quick and very accurate. I loved using this and will use it for ALL baking from now on to be sure everything is baked to perfection!
The magic temperature for a cheesecake is 65.5ºC. Once the very centre reaches this temperature, it is cooked. If you heat it to more than 70ºC then the cheesecake will overcook and crack on top.
If you don't have a thermometer then just cook it until the sides are puffy and golden and there is still a wobble in the center. If you overcook it a little and get a few cracks, don't worry because the chocolate ganache hides a multitude of sins!
You will see that I cheat and leave the bottom of my tin on the cheesecake to serve. I always do this unless it's a really posh event... It's mainly because I'm such a wimp, really; I'm far too scared of ruining it by trying to take the bottom off.
OK, so I can hear you screaming at me for the recipe at this point so I'll shut up and give it to ya! Don't forget to share pics on my Facebook page or on Twitter if you make it, I'd love to see.
print recipe
Mint Aero Cheesecake
by Kevin Chambers-Paston November-23-2014
A deliciously decadent Mint Aero cheesecake, topped with a chocolate ganache and finished with whipped cream and more crumbled Aero!
Ingredients
For the base:
150g chocolate digestive biscuits, crushed to a fine crumb
50g unsalted butter, melted
For the cheesecake:
400g full fat cream cheese
150g sour cream
2 medium eggs
300g Mint Aero, melted
For the ganache:
100g milk chocolate, chopped finely
100g double cream
To finish:
Approx 200g double cream, whipped until stiff
A small handful of Mint Aero, chopped finely
Instructions
1. Mix the chocolate digestive crumbs and melted butter together until a 'wet sand' consistency, then push down hard into the base of a greased and lined 20cm springform tin and place in the fridge. 2. Mix all the cheesecake ingredients except the chocolate together until smooth and lump-free, then stir in the melted chocolate until well combined. Pour over the chilled base.3. Bake in an oven preheated to 160ºC for around 45 minutes. It is done when the internal temperature of the very center is 65.5ºC or when the edges are puffed and brown and the center has a slight wobble. Once cooked, remove from the oven and run a knife around the edge of the tin to stop the sides from sticking. Leave to cool to room temperature.4. Whilst the cheesecake is cooling, make the ganache by pouring the double cream into a saucepan and heat until simmering. Pour this over the finely chopped chocolate and leave, without stirring, for 30 seconds to begin to melt. Stir SLOWLY until it all comes together into a lovely ganache. Stand to one side to cool.5. Once the ganache and cheesecake are at room temperature, pour the ganache over the cheesecake so that it is completely covered. It should be liquid enough to find its own level. Place in the fridge for AT LEAST 2 hours to chill.6. Top the chilled cheesecake with the whipped cream, piping if you feel like it. Sprinkle with the remaining Aero and serve!
Details
Prep time: Cook time: Total time: Yield: Around 8-10 portions, this is RICH!
For more delicious cheesecakes, check out these great blogger recipes:
Disclosure: I was sent the Thermapen by Buy Catering for free to review. I was not paid or required to write a positive review and any opinions expressed are my own.
I am reliably informed there are only 37 SLEEPS until Christmas at the time of writing. I just have to tell you that I AM SO EXCITED. I love Christmas :)
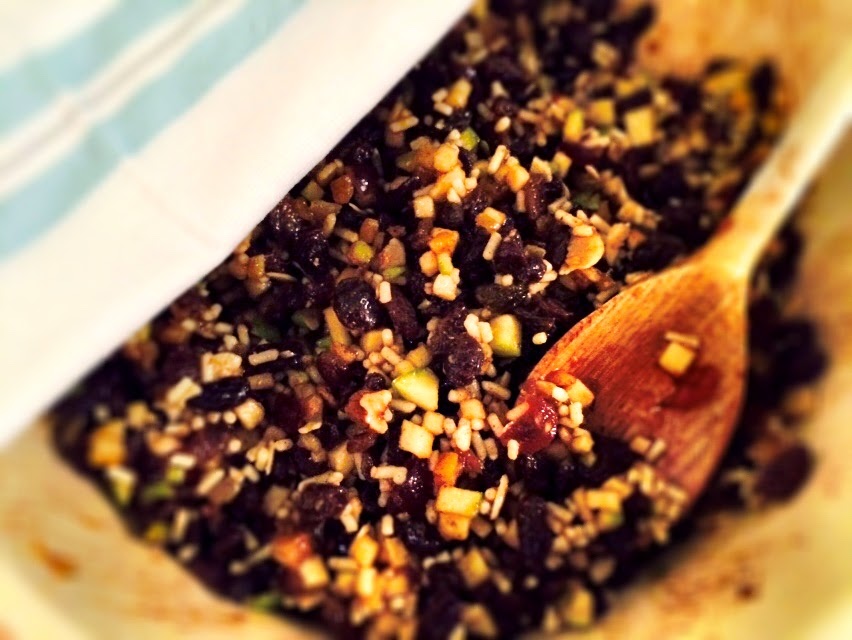
Of course, the season would not be the same without piles of beautiful mince pies. I know you can buy them fairly cheaply in the shops but nothing beats homemade mince pies straight from the oven. Without a doubt, it has to be homemade mincemeat for me too; none of the store-bought versions even come close!
If you search online for mincemeat recipes, you'll find there are two different methods; some just mix all the ingredients and then jar up, whilst others warm them through in the oven first. Personally, I prefer the second method - this is the method Delia Smith recommends and I'm sure she knows a thing or two about a mince pie! She does this as there is a small chance the apples will start to ferment whilst in the jars which could lead to exploding jars; not good for my cupboards... Heating in the oven makes sure the fat covers the apples and stops them from fermenting. Perfect!
You can be a little bit flexible with this recipe. If you don't like one ingredient, leave it out or replace it with something else! Just make sure you keep the amount of sugar and apple constant to ensure the mincemeat keeps for as long as possible.
print recipe
Christmas Mincemeat
by Kevin Chambers-Paston November-18-2014
Traditional Christmas mincemeat with some added luxury!
Ingredients
Juice and zest of 2 lemons
Juice and zest of 2 oranges
450g bramley apples, cored and chopped small (prepared weight)
250g vegetable suet
1kg mixed dried fruit (a mix of raisins, currants, sultanas, mixed peel etc.)
200g glacé cherries, chopped into quarters
400g golden caster sugar
50g flaked almonds
50g walnuts, roughly crushed
4tsp ground mixed spice
Half of a nutmeg, freshly grated
100ml brandy
Instructions
1. Place all ingredients except the brandy in a big bowl, mix well and leave, covered with a tea towel, overnight. 2. The next day, either warm in the oven at 110ºC or in a slow cooker on LOW for 3-4 hours, stirring every now and then to ensure the suet melts evenly.3. One all the fat is melted, remove from the heat and leave to cool completely, stirring regularly to distribute the cooling suet within the mincemeat.4. Once completely cold, add the brandy and stir well. Pot into sterilised jars and seal. This will store for years if sterilised correctly but leave for at least 2 weeks to mature before using - better still after a month or more!
Details
Prep time: Cook time: Total time: Yield: Around 6 standard jars of mincemeat.
As you'll know from my Slow Cooker Banoffee Cake post, I have been experimenting with the Wright's Baking mixes recently and I have been very impressed so far! Being short on time today, I decided to use one to whip up a deliciously decadent dessert (ooh, alliteration!)
This is such a simple cake I'm not even calling it a recipe, but it was so tasty I just HAD to share it with you all!
First, make up the cake according to the pack instructions (you only need the mix, 200ml water and 4tbsp oil to make the cake) and cook it in a slow cooker inside a paper case for around 2 hours on high. All slow cookers are different so PLEASE start checking it after an hour and a half at 15 minute intervals until it's done. If you don't have a slow cooker, you can cook it in the oven according to the directions on the pack.
To tart up the cake a little, I decided to make a chocolate ganache whilst it was cooking. Just pour 100g double cream into a saucepan and heat until simmering. Pour this over 100g of finely chopped chocolate and leave, without stirring, for 30 seconds to begin to melt. Stir SLOWLY until it all comes together into a lovely ganache. Cool to room temp then refridgerate.
Once the cake is cooked, remove the pot from the slow cooker and leave to cool for 10 minutes before turning the cake out onto a cooling rack and leave to cool completely.
To serve, slice a big slab of cake and put on a plate. Top with a dollop of ganache and microwave for around 30 secs or until the cake is warm and the ganache has melted all over the cake. Serve with more double cream and anything else you might like. I served mine with a chopped up mint Aero bar!
I hope you enjoy this cake and make one for yourself sometime soon!
Those of you who know me will know by now I'm a serial crafter. I love just about anything crafty and like to try out new materials all the time and see what I can make from it. One material I instantly fell in love with as soon as I tried it was polymer clay.
This is a colourful clay used for sculpting or creating small objects and can be baked in an ordinary oven in order to harden to a durable finish. It is so much fun to work with and oh so versatile; if you can imagine it then it can be made from this wonderful clay!
Why am I telling you this? Well, my love of polymer clay is the reason I've not posted in a while. Far from sitting here with my feet up, I've been helping out at the first ever Southern Polymer Clay Extravaganza (SPCE) down in Kent for the last few days and I must admit it's been a hoot!
The SPCE is the brainchild of the fantastic polymer clay artist Birdy Heywood; she wanted to create a weekend for people from all backgrounds to come together and enjoy playing with clay. She already runs a hugely successful Facebook group for anyone interested in clay (of which I am an Administrator) and she wanted to extend this into the real world. Her vision was a friendly, family atmosphere with everyone enjoying themselves eating, claying and laughing with one another. To see her dream come true was magical for me and I am so proud to have been a part of it.
The weekend comprised of 3 days of workshops with 3 tutors each offering a different workshop each day. On offer were:
This workshop was simply AWESOME! Marie has such a wealth of experience and an energy that the whole group seems to feed off. She showed us how to create these wonderful hearts from the clay and then how to antique them to give a real steampunk look. The group all had the same materials and moulds but I couldn't believe just how different the hearts all turned out. Here are mine:
And here are some other pictures of the lovely clean (ahem!) work surfaces:
Day Two - Delft Pottery Technique
This workshop was again with the wonderful Marie and she taught us the techniques to make these rather stunning delft-inspired pieces:
A layer of colour is trapped in layers of translucent clay and resin. The effect is to die for and I can't wait to try it on my own.
Once again, this was a magical workshop. The angel on the right was created with Marie's help but the decoration on the left with the mirror is my own design. I love it and will be making more to hang on my xmas tree!
Day Three - Wixie on a Rock
Birdy Heywood is known across the world for her magnifiscent and detailed sculptures and in this workshop she shared some of the secrets of how to create a cute little wixie (a cross between a witch and a pixie, of course) and sit it on its own rock. My wixie hides a little secret - her rock is actually a little trinket jar!
Isn't she just adorable?! I am in love with her and her little rock, so I now need to find some treasures for her to guard in her little jar!
So, my 3 days were spent making new things with clay and learning new techniques from masters of polymer clay. As fantastic as that was, the best part of the weekend was the atmosphere created by students and teachers alike. I can honestly say that whilst I didn't know many of the students before the weekend, I would now class each and every one of them as a friend. There are not many 'retreats' that can boast this but the atmosphere was so addictive!
Accomodation was in bedrooms each sleeping 4 people with an en-suite and the meals were provided by various people across the weekend; all were proclaimed completely delicious by all who ate them.
I feel honoured to have been a part of this weekend and I cannot wait to be a part of the next one; I am certain this will be happening again next year!
If you fancy trying out polymer clay for yourself, why not join our little Facebook group? It's full of like-minded individuals of all levels and we would love to have you.
Along with the fabulous tutors, special thanks must go out to my new 'sisters' and fellow Admin for making my weekend extra special:
Jinny 'Stabby' Holt (so-called because she loves to stab her clay creations for that 'distressed' look) - You can find her gorgeous work on Mums Shed.
Lin 'Bear Woman' Morton - This lovely lady makes fabulous spirit bears that can be found at Spirit Bear Designs.
So, that's quite enough enthusiasm from me! I'll leave you with a few pictures from the weekend of other workshops and artists you may enjoy.
It's official, I am a little bit addicted to slow cooking. As this blog clearly shows, I have a bit of a 'thing' for cooking almost everything slowly at the moment.
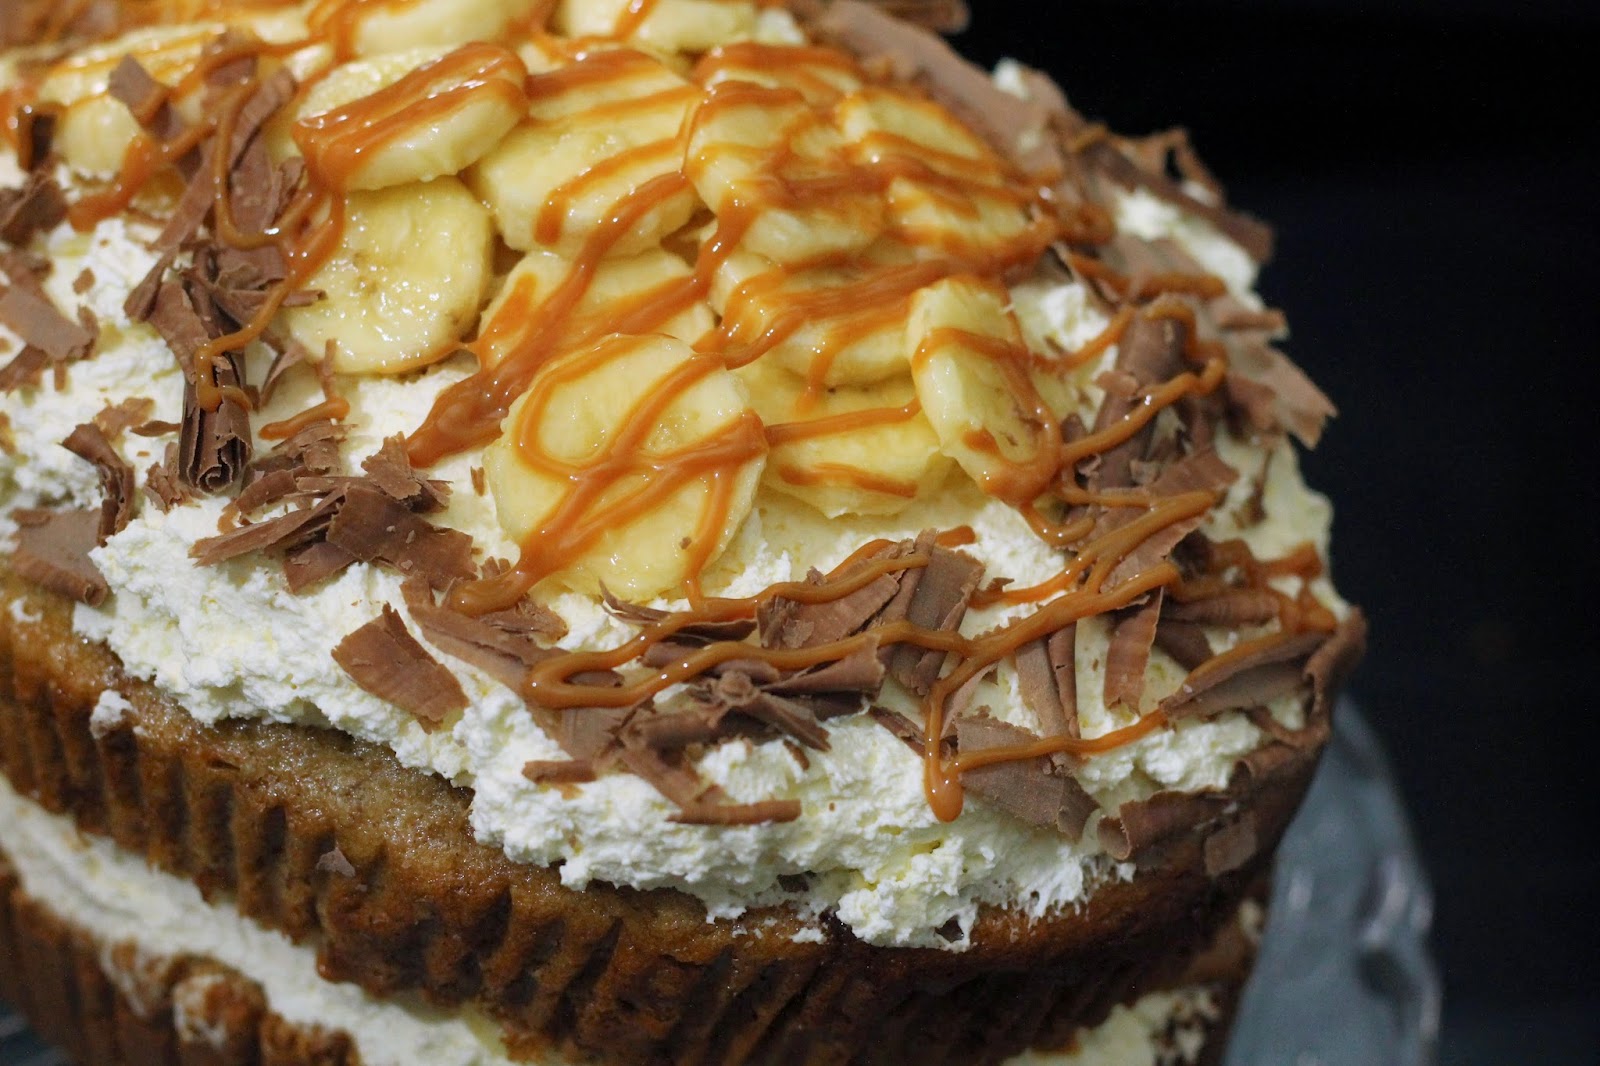
Don't get me wrong, I only slow cook if I think the recipe will benefit from it or it fits into my life a bit better... I'm not one to cook everything in there. So, when I first saw someone had cooked a cake in a slow cooker I will admit I was a little bit sceptical. I couldn't really see how there would be any benefits to doing this and continued to cook my cakes in the oven. But when I saw the delicious cakes being made by Lucy over at BakingQueen74 in her slow cooker I just HAD to give it a go! I am sooo glad I did.
I have discovered that cakes cooked in the slow cooker stay wonderfully moist and soft, just perfect for a recipe like this one.
I've also been wanting to try out the Wright's Baking cake mixes as I've heard they are delicious and so easy to make. I usually make all my cakes from scratch to my own recipe but I think it's nice to have a few tasty high-quality mixes on standby for those last minute bakes. 'Why not try one for my first attempt in a slow cooker?' I thought. Again, I am so glad I had that thought as then this baby was born!
It is a lovely toffee and banana cake, sliced and filled with whipped cream, sliced bananas and a layer of dulce de leche. It is then topped with more of the same and some chocolate flakes too. I know it's a little frowned upon to rave about your own food but for this cake I don't care; IT IS DELICIOUS!
Lucy has been very patient with me, answering all my questions and giving me tips on cooking cakes in the slow cooker and I am really grateful for all her help. Thanks, Lucy!
I have used a ceramic 3.5l slow cooker for this recipe. I know you can use other types, shapes and sizes to make it too but the timings are not something I am sure about so it'll have to be a bit of trial and error. I lined my slow cooker with a 7" cake tin liner to make it nice and easy to remove the cake and as a bonus it means I only have to wipe over the cooker rather than scrubbing it clean...
It may look a little odd, but putting a tea towel under the lid of the slow cooker is an essential part of the process. It catches any condensation that forms inside the cooker and stops it from dripping back onto the cake; this would slow down the cooking and make the cake soggy. Yuk!
Finally, I took a few pics of the 'naked' cooked cake as I wanted to show it would be beautiful just dusted with some icing sugar and served in wedges, if you like.
That's quite enough talking from me... Now, here's the recipe I've been asked for around 1000 times so far!
print recipe
Slow Cooker Banoffee Cake
by Kevin Chambers-Paston November-02-2014
A moist and delicious banana and toffee cake, baked in a slow cooker.
Ingredients
1 Wright's Baking Toffee Cake Mix
200ml water
60ml vegetable oil
2 medium bananas
For the filling and topping:
600ml double cream
1 can dulce de leche (Carnation Caramel)
2 medium bananas
1tsp citric acid (or juice of 1 lemon)
Instructions
1. Mash 2 of the bananas either by hand or in a mixer. Make the cake mix according to the pack instructions and add the bananas then bake for 1-2.5 hours until cooked (Check every half an hour from 1 hour and then every 15 mins when it is very nearly done. It is cooked when a skewer poked through the centre comes out clean.)2. Remove the slow cooker pot from the heating element and leave to cool for 10 mins then turn out the cake and leave to cool completely.3. Slice the remaining bananas and immediately put into a bowl with 400ml water and the citric acid or lemon juice; this stops them going brown when on the cake. Leave to soak whilst you prepare the other toppings. 4. Whip the cream until stiff and open the tin of Carnation Caramel. You are now ready to decorate!5. Remove the bananas from the acidulated water and pat dry. Split the cake and spread one side with a generous amount of whipped cream and the other with caramel. Lay slices of banana on top of the cream and sandwich the cake back together. Finish with another layer of cream on top, with the rest of the bananas and some chocolate shavings if desired. Store in the fridge until you are ready, then enjoy!
Details
Prep time: Cook time: Total time: Yield: 1 large cake
Check out these other great slow cooker bakes from BakingQueen74:
I am entering this cake into the November Tea Time Treats Challenge hosted by The Hedgecombers with Lavender and Lovage. The theme this month is Bonfire Night and I think with all that toffee, this cake fits that theme!


