Monday, 23 March 2015

Lemon and Cardamom Burfi

I've been very interested in and intrigued by Indian food for quite a while now. There's something about the blending of the spices, the intensity of flavours and endless combinations that really appeals to me. The trouble it, it's really hard to get started with indian cookery. There are so many spices and so many recipes out there it's near impossible to find a source to trust and to learn from in order to create my own recipes. If you know of a killer book or website that I can read, please do let me know!

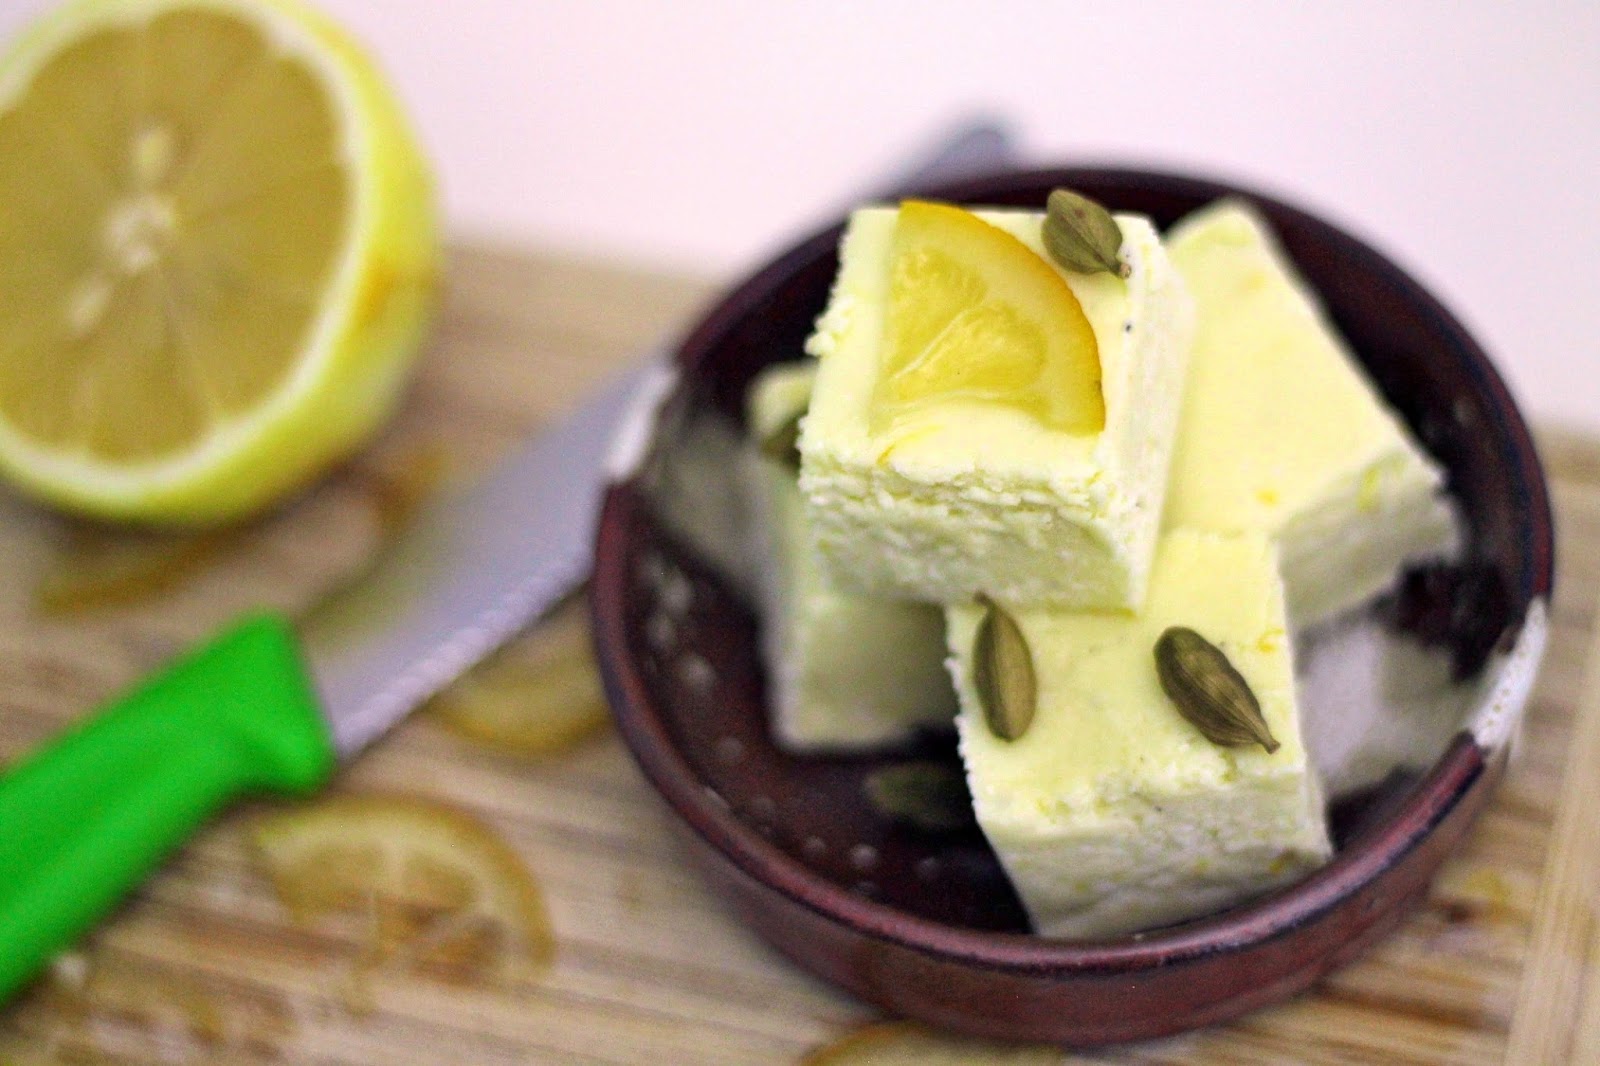
Anyway, to ease myself into Indian food I have started with Indian sweets. These burfi are, to me, a smooth, milky alternative to fudge and with my addition of lemon and cardamom they are completely delicious.


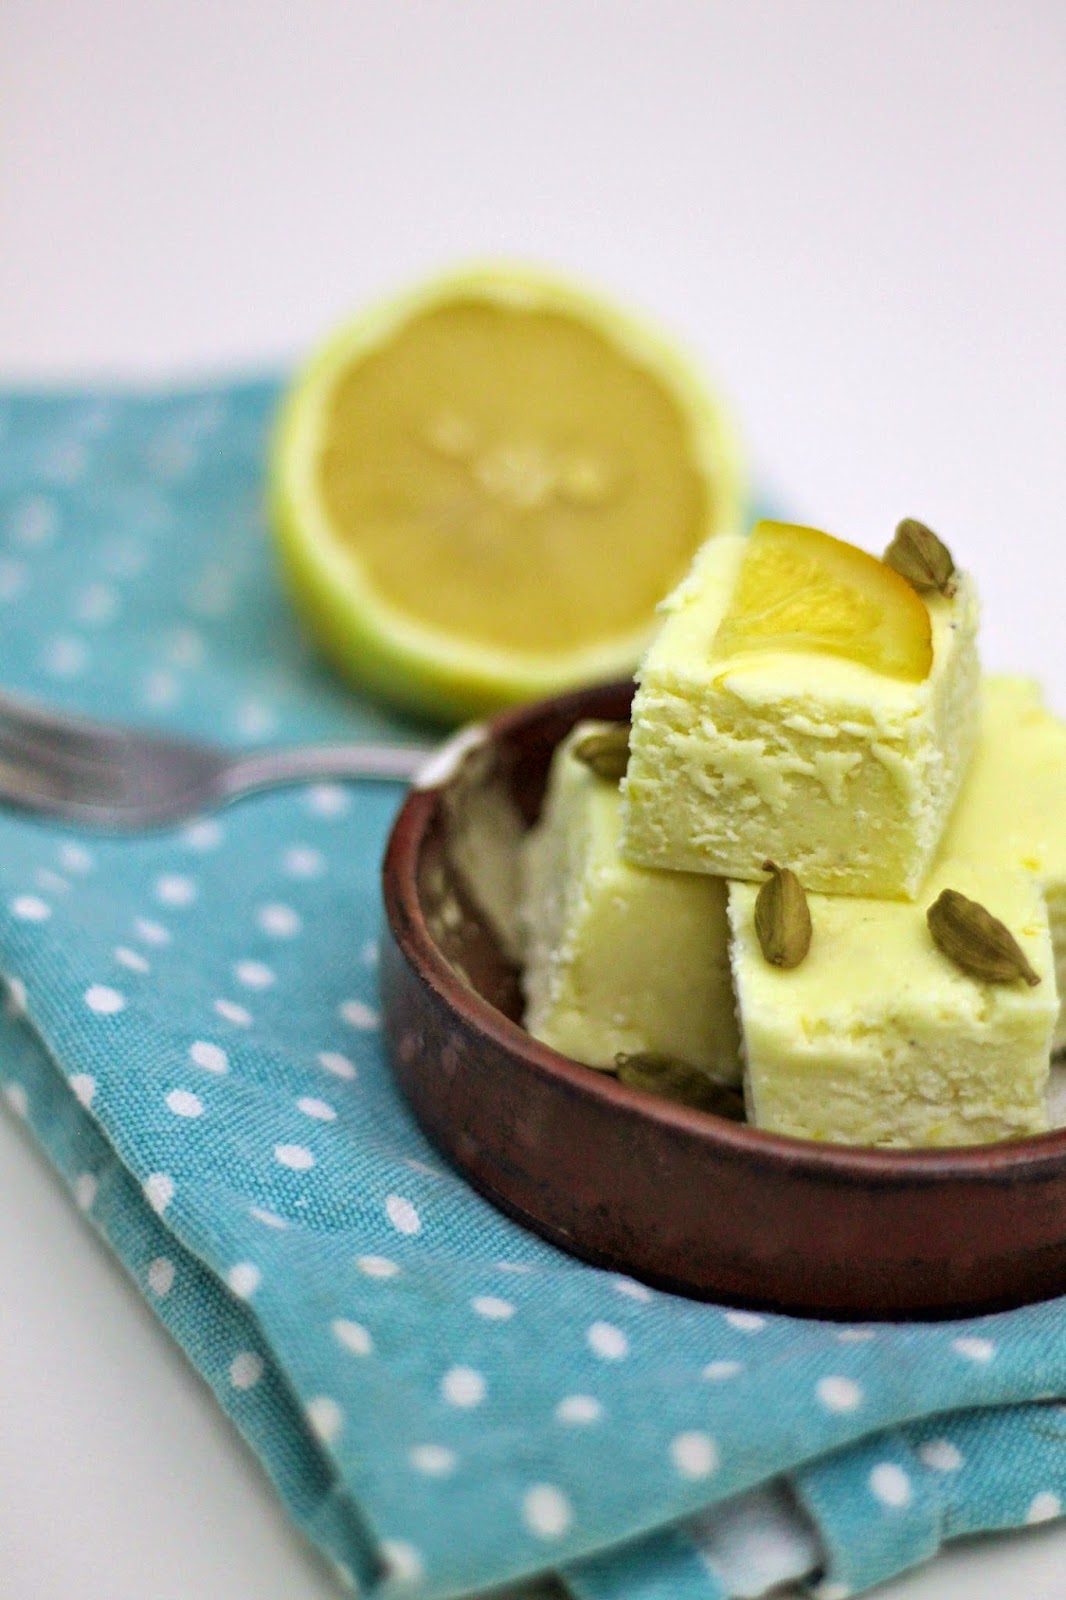
I am told (thanks to @IndianTadkaLtd) that these sweet treats can be called barfi, burfi, katli or chikki depending on the region. I've decided to call mine burfi, because that's the first name I came across when doing some research... Wherever they are made and whatever they are called, they usually contain condensed milk as a main ingredient. They can be flavoured with anything but usually fruit and nuts as well as spices. Mine have been cut into little cubes but burfi can be any shape; most commonly they are square, diamond or round.


I think these are delicious and even my mum who hates anything 'unusual' said they were very nice so I think that's a ringing endorsement! I'm not sure what my next Indian recipe will be, but if you have any suggestions then please leave a comment on this post.

That's enough talking; on to the recipe...

print recipe

Lemon and Cardamom Burfi
A traditional indian sweet, infused with the winning combo of lemon and cardamom.
Ingredients
  • 1 tin (400g) condensed milk
  • Zest of 1 lemon
  • 1tbsp lemon juice
  • 250g skimmed milk powder
  • 4 cardamom pods, seeds only, ground
Instructions
1. Put the condensed milk, lemon zest and lemon juice into a pan over a low heat and warm through. 2. When warmed, add the ground cardamom and skimmed milk powder and mix really well. Keep heating and mixing until you have a thick dough. 3. Push the dough into the bottom of a loaf tin or other similar sized tin lined with parchment paper. Use something flat to push down, keeping the top as neat as possible. 4. Leave to cool completely either at room temperature or in the fridge then turn out and cut into the desired shapes. 5. Store in a cake tin at room temperature for 1-2 days. It will last a little longer in the fridge but always bring to room temp before serving.
Details
Prep time: Cook time: Total time: Yield: At least 20 pieces


I've tracked down these other great Indian sweet recipes for you too:

Wednesday, 18 March 2015

Hot Cross Scones

Easter is fast approaching and whilst the supermarkets and social media are awash with creme eggs and hot cross buns I decided to create a variation on the tradition and developed these delicious Hot Cross Scones!


They are packed with fruit and spices, just like a traditional hot cross bun but with the texture of a scone. Perfect for afternoon tea with cream and jam or perhaps a nice quick breakfast when spread with butter. Either way, I think they are delicious...


All scones are best eaten whilst still warm from the oven, but they will keep in a cake tin for a few days; I just like to pop mine into the microwave for a minute or so to reheat before serving.


You could miss out the 'bun wash' part at the end of the recipe if you like, but I really love how it gives the scones a nice shiny coating and mimics the traditional sticky outer of a hot cross bun.

Oh, and don't ask me how you pronounce these. I don't know whether I say 'sc-oh-n'e or 'sc-on'e but does it really matter when they taste this good?!

print recipe

Hot Cross Scones
A fusion of the soft, delicious scone with the spice and fruit of a traditional hot cross bun.
Ingredients
  • 1 medium egg
  • 150ml whole milk
  • 1tbsp lemon juice
  • 250g self-raising flour
  • ½tsp baking powder
  • 2tbsp golden caster sugar
  • 50g butter or baking spread
  • A pinch of salt
  • ½tsp mixed spice
  • ½tsp cinnamon
  • ¼ whole nutmeg, grated
  • Zest of 1 orange
  • 125g mixed dried fruit (raisins, sultanas etc)
  • 2tbsp plain flour
  • 1tsp golden caster sugar
  • A pinch of mixed spice
Instructions
1. Mix the egg, milk and lemon juice together in a jug and put to one side. 2. Place the rest of the ingredients except the fruit in the bowl of a stand mixer and pulse slowly until the butter is rubbed in and the mixture resembles breadcrumbs. 3. Add the fruit and around half of the egg and milk mixture then mix. Add enough of the remaining egg and milk until it comes together as a dough. 4. Divide the dough into 6 and roughly shape them into a rounded scone shape. I don't use a cutter as I prefer the more informal shapes created by hand. 5. Place the scones onto a baking tray lined with parchment and brush some of the leftover egg and milk onto the tops. 6. For the crosses, mix the plain flour with around 1.5tbsp water to create a smooth paste. Pour into either a piping bag or a plastic sandwich bag with the corner cut off and pipe crosses over the top of the scones. 7. Bake at 180ºC for 25-30 minutes or until the scones are golden brown and cooked through. 8. As soon as the scones leave the oven, make up the bun wash by combining the sugar and mixed spice with a tbsp of boiling water. Brush this all over the scones a few times until shiny. Leave to cool and eat when still warm!
Details
Prep time: Cook time: Total time: Yield: 6 large scones


Check out some of these other great scone recipes from friends:

Saturday, 14 March 2015

REVIEW: Lust and Liquor, Norwich

Every now and then, Chris and I like to wander into the centre of Norwich for a spot of shopping and we sometimes end up having a few drinks in a bar and grabbing some food. It's a lovely way to spend a Saturday together. So, when he suggested we do just that last week I was pleased to agree and I KNEW I wanted to go to this new place called 'Lust and Liquor' as I'd read a bit about it online and a friend said they'd enjoyed it there.

It's located in the 'up and coming' area of Norwich called St Benedicts; it used to be a complete dive but recently a lot of new, vibrant venues have opened there and it's fast turning into the place to be for a meal or drinks.

Anyway, I digress. On to the review...

First Impressions
As you walk in, it certainly looks like a bar. However, you are greeted as you enter and it's obvious that they are expecting you to eat. A slight identity crisis I think.

However, we were there to eat so it didn't bother me. We were told we had to sit in the bar area to eat as we hadn't booked but I'd already anticipated that. I asked if there would be any tables in the restaurant at all that night, thinking I could have a few cocktails and wait for a table but I was told no, they were fully booked. Imagine my surprise, then, when another couple walked in and said they hadn't booked but wanted to eat and they were escorted to a table in the restaurant! Not a good start...

The decor is a generic 'trendy' bar with metal buckets for cutlery etc, nothing out of the ordinary. Apart from the bar, that is. The whole bar is covered in copper which is patinated beautifully; definitely a talking point for me! Overall, first impressions get 6/10

Service
The service was good. Our main waitress for the night said it was only her second shift so there were a few awkward moments and we found it hard to attract her attention but overall she was very friendly and when we asked for something it was brought to us promptly. 8/10

The Food (and Drink!)
When we arrived we saw it was 'happy hour' which means 2 for 1 on cocktails and that suited us just fine! Chris had a 'Lust and Liquor Mojito' and I had 'Tommy's Margarita'. They were both delicious; they took a little time to arrive but we could see the single barman making cocktails was very busy.


Lust and Liquor serve a south-american themed menu and I was impressed with the range of items on offer. After much deliberation, we decided to start with nachos which were topped with cheese, sour cream, salsa and guacamole.


The toppings were lovely; in particular, the guacamole (labelled as 'home made') was very tasty. However, that's where the positives end. I expect nachos to be hot but these certainly weren't. I think they were supposed to be, as the very small amount of cheese that was added looked like it had been melted a while ago but by the time it got to me, it was all stone cold. The cold cheese just glued the nachos together, making it rather difficult to eat.

For my main, I had the cajun chicken burritos which were served with fries, coleslaw and corn on the cob. Unfortunately, this was just as disappointing as the nachos. The lukewarm chicken didn't taste like it had ever seen any cajun spices and the corn was stone cold. The coleslaw had cumin in it, which is not to my taste, but was otherwise nice and the chips at least were hot and crisp (apart from a few soggy ones in the bottom.)

Chris had the 'Lust and Liquor Burger'. You'd think when you give your name to a dish you'd go out of the way to make it amazing but I'm afraid not here... The burger was apparently good, but nothing special.


Now, I'm not sure if any desserts were available but if they were then we certainly weren't offered any. Not to worry though, we ordered another couple of drinks instead! This time Chris had the 'Yellowbird Daiquiri' and I had a 'Boilermaker' which was a shot of Mount Gay rum and a bottle of Anchor Steam beer. The menu told us that a boilermaker should be served with the beer in a glass and the rum in another shot glass; the drinker should drop the shot into the beer and drink all in one. Imagine my surprise when it came as a bottle and a separate shot. No downing allowed here then!


All in all, I have to say the food was a poor show with the only redeeming feature being the nice cocktails. 5/10

Value for Money
All in, our trip to Lust and Liquor cost just shy of £40. I don't think that would be bad at all if the food was half decent. Sort that out and I think the prices would be great! 8/10

Overall
I'm afraid I cannot give a restaurant a good overall score when the food was as bad as this. As a cocktail bar, I would use it frequently but as a restaurant? I won't be rushing back. I'm afraid, Lust and Liquor, you are all talk and no trousers! A disappointing 5/10 overall.


Thanks for reading! If you've been here and want to express your opinions, then please let me know! I have heard other people saying good things so this could have just been a 'bad night' though their Facebook page tells me that others do agree with me.

Thursday, 5 March 2015

Peanut Butter Popcorn Bark

You may have seen my first Larder List back in January where I was raving about a new product I'd found called 'Peanut Hottie'. I had a few messages after this asking if I'd ever tried baking with it and I hadn't at that time but did have plans to give it a go.


Chocolate is always a great match for peanuts in my book, so I decided to combine it with some popcorn too with this delicious bark being the end product. OK, so I know it's still not TECHNICALLY a bake, but it is using Peanut Hottie for something other than a drink!

The Peanut Hottie works brilliantly in this recipe as it's a powder that's had the fat removed. If you tried to use regular peanut butter, it would make the chocolate softer and I like my bark with a satisfying snap to it.

As you may already know, to get chocolate to behave in these kinds of recipes, you need to temper it. This means the chocolate will retain the glossy finish and 'snap' and it won't bloom and look unsightly after a few hours. However, I find tempering a particularly troublesome and complex process. In the past I've turned to products such as Candy Melts but I have been underwhelmed by the flavour of these in comparison to 'real' chocolate.

So, imagine my delight when I opened a pack of PME Candy Buttons and tasted them to find they were a really passable substitute for real chocolate! Don't get me wrong, I wouldn't use them in something where a high quality chocolate flavour is desired but for everyday baking and confectionary making, I think these are a winner! No messing with thermometers, double boilers or any of that stuff; just pop in the microwave and melt. Simples!

If you are really averse to the idea of candy buttons then by all means use real chocolate.


The recipe for this bark is so simple you almost won't believe it, especially when you see how great it tastes too!

print recipe

Peanut Butter Popcorn Bark
A sweet treat, combining the flavours of peanut butter, popcorn and milk chocolate.
Ingredients
  • 340g 'milk chocolate' candy buttons
  • 3tbsp Peanut Hottie powder
  • 25g sweet & salted popcorn, plus extra for topping
Instructions
1. Chop, smash, process, blend or otherwise break down the popcorn into smaller pieces and distribute evenly on a lined tray.2. Melt the candy buttons, stir in the Peanut Hottie and pour over the popcorn, using a palette knife to smooth it out and make sure the chocolate has covered all of the popcorn.3. Place some whole pieces of popcorn on the top, pushing into the chocolate slightly then leave to set.4. Break into pieces and enjoy!
Details
Prep time: Cook time: Total time: Yield: Lots of lovely bark!

Take a look at my Pinterest board, for more great bark ideas:

Follow Kevin Chambers-Paston's board All Bark and No Bite! on Pinterest.

Or, you can see these great barks from other food bloggers:
"; n.innerHTML = at; container.insertBefore(n , footer); } } return true; }; document.doAT('hentry');
Related Posts Plugin for WordPress, Blogger...

Other interesting websites